Backing up MySQL with Replication and Incremental Files – Part 1

I’m trying this new idea for backing up our production MySQL servers. I have a backup server that basically runs rdiff-backup in the morning across several servers, but then does nothing for the rest of the day. It’s a pretty decent machine, so I’d like to utilize some resources. Databases are a tough cookie to backup. You can’t just copy the data files and then expect to copy them back over and have them just work. Especially if your databases have a mixture of InnoDB and MyISAM tables. In order to do a clean and accurate database backup, you need to stop the MySQL server, then copy the files, then restart MySQL.

If you have a live production MySQL server, stopping it to make a backup is not really an option. Fortunately there are a few options. Before you decide on which option to choose, here is a list of things to keep in mind when choosing a backup solution (from the MySQL gurus at Percona):

WHAT TO LOOK FOR

http://www.mysqlperformanceblog.com/2009/03/03/10-things-you-need-to-know-about-backup-solutions-for-mysql/

  1. Does the backup require shutting down MySQL? If not, what is the impact on the running server? Blocking, I/O load, cache pollution, etc?
  2. What technique is used for the backup? Is it mysqldump or a custom product that does something similar? Is it a filesystem copy?
  3. Does the backup system understand that you cannot back up InnoDB by simply copying its files?
  4. Does the backup use FLUSH TABLES, LOCK TABLES, or FLUSH TABLES WITH READ LOCK? These all interrupt processing.
  5. What other effects are there on MySQL? I’ve seen systems that do a RESET MASTER, which immediately breaks replication. Are there any FLUSH commands at all, like FLUSH LOGS?
  6. How does the system guarantee that you can perform point-in-time recovery?
  7. How does the system guarantee consistency with the binary log, InnoDB logs, and replication?
  8. Can you use the system to set up new MySQL replication slaves? How?
  9. Does the system verify that the backup is restorable, e.g. does it run InnoDB recovery before declaring success?
  10. Does anyone stand behind it with support, and guarantee working, recoverable backups? How strong is the legal guarantee of this and how much insurance do they have?


BACKUP PROGRAMS

There are a few MySQL backup products out there as well. I have used the first two on this list.

  • AutoMySQLBackup script (handy for making a rotating incremental backup of your MySQL databases).
  • Percona XtraBackup (nice way to ensure InnoDB and MyISAM tables are backed up properly, also does it incrementally)
  • Zmanda (seems to be similar to Percona’s set up)

There’s probably a gazillion more out there. Google’s your friend in finding things you need.

HOW TO DO IT
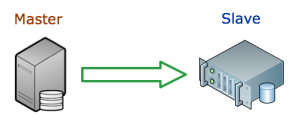
How to get a copy of the master to the slave?

There are several options. You could use a script above, or create a slave of the database (basically an exact copy of the production MySQL server – all changes that occur in the master are sent to the slave), or some combination. I’ll use a combination. I’ll replicate the production server onto the backup server, then run the incremental backups from there. This first part will walk through the process of setting up MySQL replication.

To give proper credit, here are several other how to’s I found helpful.

On the master server

Step 1. Edit the my.cnf file to include at least the following (if needed) lines. Note: you will have to restart MySQL for these changes to take affect.

[mysqld]
server_id=1
innodb_flush_log_at_trx_commit=1
log_bin=mysql-bin.log
sync_binlog=1

Step 2. Make a MySQL user for the slave to use.

In a MySQL session on the terminal, type in the command:

GRANT REPLICATION SLAVE ON *.* TO 'rep_user'@'localhost' IDENTIFIED BY 'passwordhere';

Step 3. Open a terminal session and log in to a MySQL prompt. Type the following command and hit enter.

FLUSH TABLES WITH READ LOCK

Note: This will lock your database so that no changes can be made from any web applications or other programs. This session should remain open, and the database locked for the next few steps.

Step 4. After the FLUSH TABLES command finishes, run the following command and press enter.

SHOW MASTER STATUS

Record the information under “File Name” and “Position”.

Step 5.  Make a copy of the database files.

5.1 LVM Snapshot:

In another terminal session, run the following command to make an LVM snapshot of the database.

lvcreate -L10G -s -n mysql-backup /dev/mapper/dbases

This creates a snapshot of the database files very quickly. We can use the snapshot later to copy the data to the backup server without interfering with the original database files.

After this command finishes, you can unlock the database as shown in the next step. Then you can mount the new LVM partition and copy the files to the backup server.

mkdir -p /mnt/mysql-backup
mount -o nouuid /dev/mapper/mysql-backup /mnt/mysql-backup
rsync -avz -e "ssh -c blowfish" /mnt/mysql-backup user@remote.host:/backup/location

5.2 RSYNC:

If you don’t have your database files on an LVM partition, you can just copy the files to the backup server now using rsync, scp or what have you. This will take significantly longer (depending on the size of your database), leaving the database in a locked state.

rsync -avz -e "ssh -c blowfish" /dbases/mysql user@remote.host:/backup/location

5.3 MySQL Dump:

You could also take a mysqldump of the database and copy that SQL file to the other server.

mysqldump -uuser -p --all-databases > mysql-backup.sql
scp mysql-backup.sql user@remote.host:/backup/location

Step 6. Once the lvcreate command has finished, you can unlock the database.

UNLOCK TABLES

Step 7. If you haven’t already, copy the copy of the database files to the backup server.

On the slave server

Step 1. Edit the my.cnf file to include at least the following (if needed) lines. Note: you will have to restart MySQL for these changes to take affect.

[mysqld]
server_id=2

Step 2. Start MySQL and run the following commands in a mysql session to start the MySQL slave.

CHANGE MASTER TO
MASTER_HOST = "master.server.com",
MASTER_USER = "rep_user",
MASTER_PASSWORD = "passwordhere",
MASTER_LOG_FILE = "mysql-bin.log",
MASTER_LOG_POS = 2341234;

The MASTER_HOST is the domain name or IP address of the master server. MASTER_USER, MASTER_PASSWORD were created on the master server in Step 2. MASTER_LOG_FILE and MASTER_LOG_POS were gathered in Step 4.Then, finally, to start the slave, issue the following command in mysql.

START SLAVE;

THATCamp 2012

Believe it or not, this was my first ever THATCamp experience. Seems hard to imagine since I have worked at CHNM since before the inception of THATCamp.  Ah, well, the stars finally aligned, and was able to attend this year. And it was great.


I attended three workshops on Friday, and a couple of sessions on Saturday. Here are some thoughts…

Digital Data Mining with Weka: This was a neat crash course on what data mining is and is not, and one free tool to help do some of that. It was more of a “here’s what’s out there, how does it apply to the humanities” than a hands on, hands dirty, do some real work type of work shop. But it was good in that it opened up the possibility to do some data mining in the future. Since they were relatively small, here my notes:

What is data mining?

examples:

  • recommend ads, products to users based on purchases
  • finding patterns in large amounts of text (writing algorithms to find those patterns)

Goal of data mining is to predict what users/people will do based on data from other users/people

Data mining Tasks: classification, clustering, association rule discovery, sequential pattern discovery, regression, deviation detection

Goal is to predict the classification (or whatever) of future data, based on the current data that you analyze.

Cross validation (when done correctly you get true results, when not done correctly you get false results)

have multiple sets of data, one for training and the other for testing. Build the algorithm on the training data, then run it on the test. Then cycle through each testing data set and have it act as a training set. Do this way because you know the results for each, so you can tell if your algorithm is correct. When it’s good then you can use it on future data where you don’t know the result.

Interesting Things You Can Do With Git: This one was highly anticipated. I have been wanting/needing to learn git for a while now. For being in the IT field, having written some code, and even having a GitHub account with code on it, I’m ashamed to say I still don’t know how to use git effectively. There is not much you can do in 1.5 hours, and this was more a theoretical “here are some ideas”, than a “here is how to do it” approach.

The session on using blogs as assignments was maybe a bit premature for me. The session was really good, great ideas, tips, etc. But me teaching is still too far away for me to have put the mental effort in to following along much. I spent most of the time trying to find a good twitter client, but in the end just stuck with Adium.

Then I took some time to enjoy the hacker space. I decided it was time, and this was the perfect place to set up a transcription tool for my dissertation archive. So sitting at the very table where it is coded, I installed the Scripto plugin for Omeka. That’s a bit of a misnomer, since it is really a wrapper that lets Omeka and a Wikimedia install play nicely together. I went ahead and transcribed one of the documents in the archive as well. The archive is just in the testing phase, but here it is anyways: http://nazitunnels.org/archive

Nazi Tunnels Archive

The final event of THATCamp for me was one last session proposed by a fellow “camper”. She wanted help learning about the shell/terminal/command line. So I volunteered to help out with that. It ended up that there were about eight people that wanted help learning the command line, and four of us that knew what we were doing. So it ended up being a great ratio of help needed to those who could offer it. We started with the very basics, didn’t get much past a few commands (ls, cd, rm, nano, grep, cat), but we went slow enough that everybody who was trying to follow along was able to, and they all left with a clearer understanding of what the shell is for, and why it is useful. The proposer found a great tutorial/book for learning the command line that I’ll have to go through as well. You can always learn something new.

What was also great about that session, since it was basically ran by those who needed the help, I saw how those who struggle with these concepts learn them, so I will hopefully be better able to teach them to others in the future.


UPDATE: I forgot to mention the many cool sites and projects mentioned during Saturday morning’s Dork Shorts. Here’s a list of the ones I took notice of.

http://afripod.aodl.org/
https://github.com/AramZS/twitter-search-shortcode
http://cowriting.trincoll.edu/
http://www.digitalculture.org/2012/06/15/dcw-volume-1-issue-4-lib-report-mlaoa-and-e-lit-pedagogy/
http://luna.folger.edu/luna/servlet/BINDINGS~1~1
http://www.insidehighered.com/blogs/gradhacker
http://hacking.fugitivetexts.net/
http://jitp.commons.gc.cuny.edu/
http://www.neh.gov/
http://penn.museum/
http://www.playthepast.org/
http://anglicanhistory.org/
http://podcast.gradhacker.org/
http://dhcommons.org/
http://ulyssesseen.com/
http://m.thehenryford.org/

Filling in the missing dates with AWStats

Doh!

Sometimes AWStats will miss some days in calculating stats for your site, and that leaves a big hole in your records. Usually, as in my case, it’s because I messed up. I reinstalled some software on our AWStats machine, and forgot to reinstall cron. Cron is the absolutely necessary tool for getting the server to run things on a timed schedule. I didn’t notice this until several days later, leading to a large gap in the stats for April.

What to do?

Fortunately, there is a fix. Unfortunately, it’s a bit labor intensive, and depends on how you rotate your apache logs (if at all, which you should). The AWStats Documentation (see FAQ-COM350 and FAQ-COM360) has some basic steps to fix the issue, outlined below:

  1. Move the AWStats data files for months newer to a temporary directory.
  2. Copy the Apache logs with all of the stats for the month with the missing days to a temporary directory.
  3. Run the AWStats update tool, using AWStat’s logresolvemerge tool and other changed paramaters, to re-create the AWStats data file for that month
  4. Replace the AWStats data files for the following months (undo step 1).

The Devil’s in the Details

Again, depending on how you have Apache logs set up, this can be an intensive process. Here’s how I have Apache set up, and the process I went through to get the missing days back into AWStats.

We have our Apache logs rotate each day for each domain on the server (or sub-directory that is calculated separately). This means I’ll have to do this process about 140 times. Looks like I need to write a script…

Step 1. Move the data files of newer months

AWStats can’t run the update on older months if there are more recent months located in the data directory. So we’ll need to move the more recent month’s stats to a temporary location out of the way. So, if the missing dates are in June, and it is currently August, you’ll need to remove the data files for June, July, and August (they look like this awstatsMMYYYY.domain-name.com.txt where MM is the two digit month and YYYY is the four digit year) to a temporary directory so they are out of the way.

Step 2. Get the Apache logs for the month.

First step is to get all of the logs for each domain for the month. This will work out to about 30 or 31 files (if the month is already past), or however many days have past in the current month. For me, each domain archives the days logs in the following format domain.name.com-access_log-X.gz and domain.name.com-error_log-X.gz where the X is a sequential number. So the first problem is how to get the correct file name without having to look in each file to see if it has the right day? Fortunately for me, nothing touches these files after they are created, so their mtime (the time stamp of when they were last modified) is intact and usable. Now, a quick one-liner to grab all of the files within a certain date range and put their content in a new file.

We’ll use the find command to find the correct files. Before we construct that command, we’ll need to create a couple of files to use for our start and end dates.

touch --date YYYY-MM-DD /tmp/start
touch --date YYYY-MM-DD /tmp/end

Now we can use those files in the actual find command. You may need to create the /tmp/apachelogs/ directory first.

find /path/to/apache/logs/archive/ -name "domain-name.com-*" -newer /tmp/start -not -newer /tmp/end -exec cp '{}' /tmp/apachelogs/ \;

Now unzip those files so they are usable. Move into the /tmp/apachelogs/ directory, and run the gunzip command.

gunzip *log*

If you are doing the current month, then copy in the current apache log for that domain.

cp /path/to/apache/logs/current/domain-name.com* /tmp/apachelogs/

This puts all of the domains log files for the month into a directory that we can use in the AWStats update command

Things to note: You need to make sure that each of the log files you have just copied use the same format. You also need to make sure they only contain data for one month. You can edit the files by hand or throw some fancy sed commands at the files to remove any extraneous data.

Step 3. Run the AWStats logresolvemerge and update tool

Now comes the fun part. We first run the logresolvemerge tool on the log files we created in the previous step to create one single log file for the whole month. While in the <code>/tmp/apachelogs/</code> directory, run:

perl /path/to/logresolvemerger.pl *log* > domain-name.com-YYYY-MM-log

Now, we need to run the AWStats update tool with a few parameters to account for the location of the new log file.

perl /path/to/awstats.pl -update -configdir="/path/to/awstats/configs" -config="domain-name.com" -LogFile="/tmp/apachelogs/domain-name.com-YYYY-MM-log"

Step 4. Move back any remaining files

If you moved any of the AWStats data files (awstatsMMYYYY.domain-name.com.txt like for July and August in our example) now’s the time to move them back where they go.


Yeah, that fixed it!


Phew! The missing dates are back!


Scrivener and Zotero

Scrivener is awesome software for writing, that I’ve mentioned before, but I had yet to really test out the integration with Zotero (my citation manager of choice). So now that I have finally started on my dissertation writing in earnest (and not grant writing), I needed to make sure that footnotes are usable in my work flow. So this is a quick write up of the tools I will use in writing my dissertation, and how I will use them.

The Tools

LibreOffice: Free and Open Source document software. Who knows how long I will have access to free Microsoft Word? LibreOffice (the fork of OpenOffice) will always be free and freely available. The steps will be basically the same if you are using Microsoft Word, just substitute that program for LibreOffice when it comes to it.


Zotero: I’m certainly biased, but Zotero is the greatest citation management software evar! Also free and open source. I’m using the stand alone version, but you can use the Firefox extension as well. Should work the same.


Scrivener: The greatest writing software I’ve seen. So good I even paid for it. I don’t usually do that with software (as you can see, I like free and open source).


The Process

Here I will try to outline the process I found that will save footnotes from existing documents into Scrivener, and Scrivener created footnotes into exported documents. From there, it’s easy to create Zotero connected footnotes.

1. Copy existing documents with footnotes into Scrivener

Copy from LibreOffice

The first issue to run across is to put your existing documents into scrivener. I wrote a paper for Hist 811 that is basically the bulk of Chapter 1 and Chapter 2 of the dissertation. It’s needs some finessing in order to fit in the dissertation. It would be a shame to lose the footnotes, which is what happens if you just use Scrivener’s import file process. This is an easy fix. Just copy the text from your document and paste it into a Scrivener text area.

Then with your Scrivener project open, create a new text area, or select an existing one, which ever, and paste it in. Nothing special there.


2. Create new footnotes in Scrivener

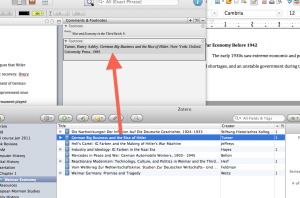
Scrivener makes a Footnote
See how Scrivener makes a footnote!

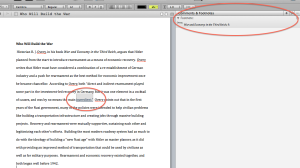
What is special, though is what Scrivener does with that footnote. See there, footnote number 20, right after the quote about the cocktail of causes and rearmament being one of the ingredients? Now in Scrivener we have the word “ingredient” highlighted and underlined, and on the right side of the Scrivener window, there is a new footnote with all of the content of the original footnote. Sweet!


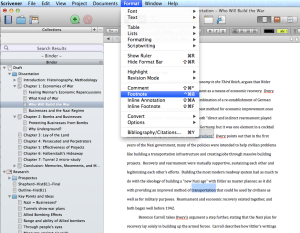
Easy as Format->Footnote, or use the shorcut keys Ctrl-Cmd-8

That’s all well and good. What if we want to edit the text a little bit, add some good stuff and add another footnote in there? What do we do? Well, Scrivener has a way to add a footnote. Just highlight some text (the footnote will be inserted after the last word), and go to the Format menu and select Footnote. Or you can use the fancy shortcut keys, for faster typing and footnote inserting, Ctrl-Cmd-8 (⌃⌘8).


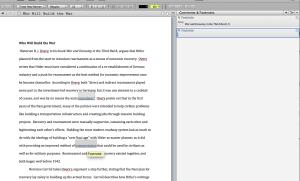
Look, Ma! A new footnote!

Now you have a new, blank, footnote area to put a footnote reverence in.


Select the reference in Zotero and drag it into the footnote box in Scrivener.

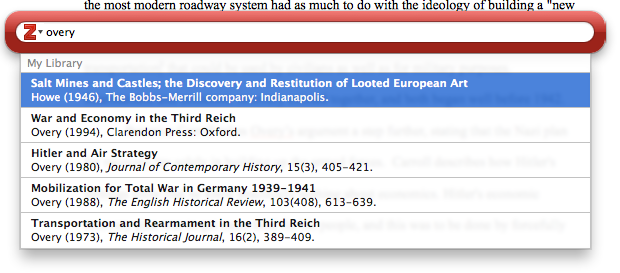
Zotero makes it easy to put the reference in that new empty footnote with drag and drop citations. Just pull up your Zotero (either from Firefox, or if you have the standalone version). Select the reference you want, and drag it into the empty footnote section.


3. Moving from Scrivener to a document, and keeping your footnotes!

So, ideally, you would be able to export your text document, and all of these lovely footnotes you have made in Scrivener, using Zotero, would just magically work in a Word or LibreOffice document. It doesn’t, yet (or ever?). So here is how to get your footnotes into a document, and then get those footnotes to be Zotero enabled.

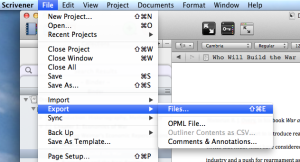
Srivener->File->Export->Files

First, you export your Scrivener document to RTF format.


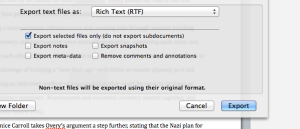
Select RTF format

Select the plain RTF format, and the first check box for only the selected files (although, you could un check this if you want to do all of your files at once. No other check boxes are needed. Then just hit the Export button.


Open it up with your favorite document program, LibreOffice or Word.

Next, you will want to open your new RTF document in LibreOffice (or Word if you’re using that program).


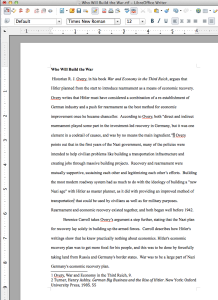
All my citations are in the house!

You will notice that all of your footnotes are in this file. Yeah! Sometimes the text had odd font sizes and styles. So a quick ‘Select All’ and change it to default style and Times New Roman, 12 pt should fix that right up. Now here is the labor intensive part. For each footnote, we’re going to have to recreate it so that it is handled by Zotero. Then we’ll delete the original footnote. It would be nice of Scrivener could export the footnotes in a way that Zotero could detect them, but alas it is not to be.
 

Now you add a citation through the zotero buttons to make a zotero-aware citation.


All my citations are in the house!

Insert a Zotero citation using the Zotero buttons in your document program’s menu bar.


I prefer the Zotero classic view.


The new citation find view is pretty slick, though.


You can add pages with a coma, space, number.


Now you have two citations.


With two citations in the document, you’ll need to delete the one that was not made by zotero.


Just make sure you delete the non-zotero aware citation. The Zotero citation is usually highlighted.


Now you can save the document as a different file format: odt, doc, docx

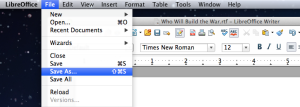
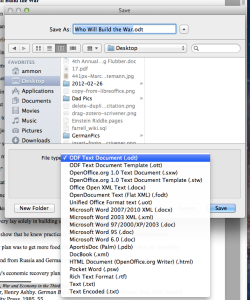
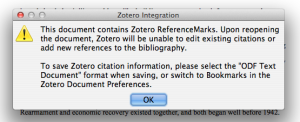
Now save the document as an ODT document. If it is saved as anything else, it will not be Zotero aware.


Take your pick of file types.


Save as the correct file format if you want Zotero to be able to edit them again.


One alternative method is to create footnotes in Scrivener using the format {Author, Year, Page#}. Then export as an RTF document as before. Then, in Zotero, use the ‘RTF Scan’ tool in the Preferences menu. Zotero will see all of the citations and replace them nicely with formatted citations (using Ibid. and short notation for repeat books, and such). Zotero will not be aware of these citations at all, so if you need them to be Zotero aware, you might as well use the steps outlined above. If you do not expect to update citations or the text once done in Scrivener, then this may be the easiest way to go.
Now I can happily transfer existing documents into Scrivener and save the footnotes!

Setting up a Hosting Environment – Part 2: Connecting the Storage Array

[See Part 1: The Servers]

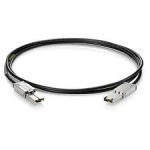
One of the most frustrating parts of this set up was getting the storage array talking to the servers. I finally got it figured out. I’m using a StorageTek 2530 to connect to two SunFire X2100 M2’s via SAS (Serial Attached SCSI) cables. I put in a dual port SAS HBA (Host Bus Adapter) in the X2100 M2’s, but for real redundancy, I should have used two single port HBA’s. The Sun/Oracle documentation is pretty good about how to physically set up the servers and storage array, but are pretty lacking from there on.

StorageTek 2530 Set Up

Replace the parts in squares brackets below with whatever you want.

  • Install the Sun CAM software.
    • Grab the latest version from http://support.oracle.com
      • You’ll need an active support contract and have an account.
      • Go to the ‘Patches and Updates’ tab.
      • Click on the ‘Product or Family (Advanced)’ link
      • In the ‘Product is’ section start typing in ‘Sun Storage Common Array Manager (CAM)’ and select it from the list
      • In the ‘Release is’ section select the most recent version
      • For the last section, select ‘Platform’ and then select ‘Linux x86-64’
      • Click ‘Search’
      • Click the ‘Download’ link for the software.
      • Upload the tar file to the server.
    • Pre-requisite software that needs to be installed.
      • yum install ksh bc /lib/ld-linux.so.2 libgcc.i686 libstdc++.i686 libzip.i686 gettext
    • Once CAM software is downloaded, un-zipped, un-tarred or what have you, change directories to HostSoftwareCD_6.9.0.16/components and install the jdk available there:
      • rpm -Uvh jdk-6u20-linux-i586.rpm
    • Next run the RunMe.bin file in the HostSoftwareCD_6.9.0.16 folder
      • ./RunMe.bin -c
    • Agree to all License Agreement stuffs
    • Select the Typical install.
  • Add the /opt/sun/cam/binfolder to path
    • With root using tcsh add this to .tcshrc
      • setenv PATH ${PATH}:/opt/sun/cam/bin
    • Then do source .tcshrc
  • Make sure there is an IP on the same subnet as the array (192.168.128.xxx)
    • Make a /etc/sysconfig/network-scripts/ifcfg-eth1:1file and put this in there
      • DEVICE=“eth1:1”
        BOOTPROTO=static
        HWADDR=“xx:xx:xx:xx:xx:xx:xx”
        IPADDR=192.168.128.xxx
        NM_CONTROLLED=“no”
        ONBOOT=“yes”
    • Install the RAID Proxy Agent package located in the Add_On/RaidArrayProxy directory of the latest CAM software distribution. (I found this to be optional.)
      • rpm -ivh SMruntime.xx.xx.xx.xx-xxxx.rpm
      • rpm -ivh SMagent-LINUX-xx.xx.xx.xx-xxxx.rpm
  • Register the StorageTek with the host. Process can take several minutes.
    • sscs register -d storage-system
  • Once registered, you can name the array anything you want. Note what the array is named from the previous step.
  • sscs modify -T [Array-Name] array ARRAY1
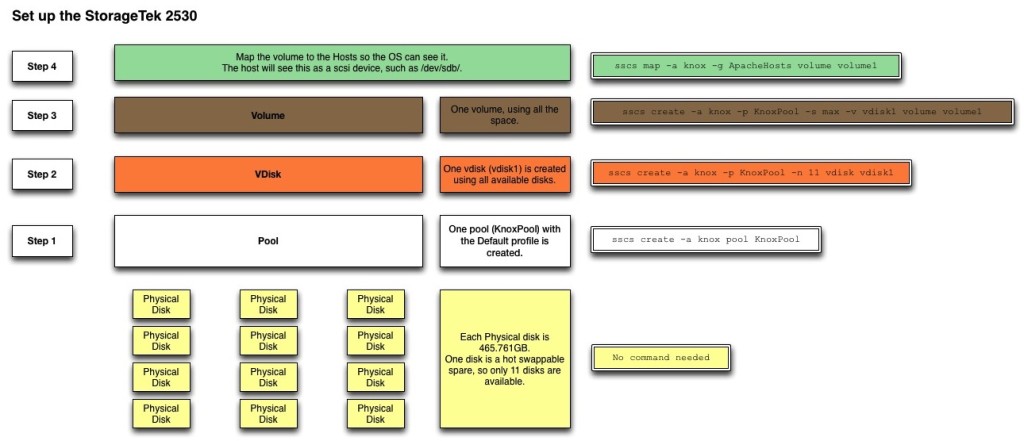
  • Set up the storage profile, pool, disk, volume, mapping. Use the command line commands below, or set it up via the web interface. NOTE: This part only needs to be done on one of the hosts.
    • If using the web interface, you have to use a windows laptop hooked up to the local network (192.168.128.xxx), or perhaps a server in the same local network that is not running CentOS 6, which has a known issue where the web interface does not work. For the web interface connect to https://localhost:6789 using the laptop or server Administrator/root account information.
    • sscs create -a knox pool [Pool-Name]
    • sscs create -a knox -p [Pool-Name] -n 11 vdisk [Vdisk-Name]
    • sscs create -a knox -p [Pool-Name] -s max -v [Vdisk-Name] volume [Volume-Name]
  • Create the host group and apply to host.
    • sscs create -a knox hostgroup [ApacheHosts]
  • Create hosts and assign to hostgroup
    • sscs create -a knox -g [ApacheHosts] host [Host-Name] and repeat for other hosts.
  • Map volume to host group
    • sscs map -a knox -g ApacheHosts volume Volume-Name
  • The array volume should now be available as /dev/sdb and /dev/sdc because the hosts are connected by two SAS cables each.
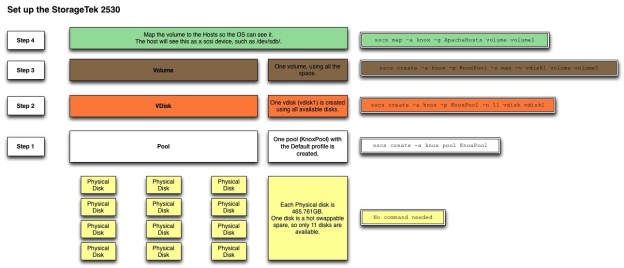
  • It took me a while to grasp the meaning for the different terms: pool, volume, volume groups, disks, etc. I drew up a chart with the appropriate commands to create the different aspects.

    To utilize both cables connecting the server to the storage array, the OS needs to use multi-pathing. I had lots of troubles trying to set this up after the OS was installed, so I just let it be done by the installer. Here’s what should happen if you find the OS already installed and need to set up multi-paths.

    • Set up DM-Multipath
      • NOTE: This is taken care of during the OS installation.
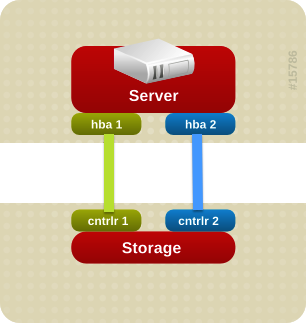
      • Multipath allows both SAS connections to the storage array to appear as one connection to the server. This allows for data to pass through even if one cable suddenly stops working, it seamlessly fails to the other path. For example, taken the image above, if the connection between hba1->cntrlr1 goes down, you still have connection hba2->cntrlr2. The OS sees one connection, and just uses whichever path is working.
      • After Multipath is set up, the storage array will be available as a device at /dev/mapper/mpatha. This will be the device to partition, format, and throw LVM on.
      • Install the multipath program and dependents
        • yum install device-mapper-multipath
      • Run mpathconf --enable to create a default /etc/multipath.conffile or create one using the following:
        • #  multipath.conf written by anacondadefaults {
          user_friendly_names yes
          }
          blacklist {
          devnode “^(ram|raw|loop|fd|md|dm-|sr|scd|st)[0-9]*”
          devnode “^hd[a-z]”
          devnode “^dcssblk[0-9]*”
          device {
          vendor “DGC”
          product “LUNZ”
          }
          device {
          vendor “IBM”
          product “S/390.*”
          }
          # don’t count normal SATA devices as multipaths
          device {
          vendor “ATA”
          }
          # don’t count 3ware devices as multipaths
          device {
          vendor “3ware”
          }
          device {
          vendor “AMCC”
          }
          # nor highpoint devices
          device {
          vendor “HPT”
          }
          wwid “3600508e000000000c9c1189277b84b05”
          device {
          vendor TEAC
          product DV-28E-V
          }
          wwid “*”
          }
          blacklist_exceptions {
          wwid “3600a0b80003abca4000007284f33c167”
          }
          multipaths {
          multipath {
          uid 0
          gid 0
          wwid “3600a0b80003abca4000007284f33c167”
          mode 0600
          }
          }
      • Set multipathd to start on boot, and if not on, turn it on
        • chkconfig multipathd on
        • service multipathd start

    Setting up a Hosting Environment: Part 1 – The servers

    I’ve spent a lot of time at work setting up a few servers to be our new production environment. Much of it was accomplished by reading the documentation over and over again. Not much out there on the Net, so I’m hoping this series of posts benefits someone else out there.

    First of all, I’ll cover what set up I would like to achieve and why.

    Hardware

    I’m using two Sun SunFire X2100 M2 connected to a StorageTek 2530 with 4.5TB of drive space. The servers attach to the storage array via SCSI cables for quick data transfer speeds. The array also has the ability to handle iSCSI connections. This will give me a decent base set up, with room to grow.

    Set up

    I’ll put the two servers in a cluster and make the services available over the cluster. They will share the storage using GFS2. In the future, I’ll add a couple of load balancer/proxy machines to farm out the Web traffic, and add a couple more SunFire X2100 M2’s to take that load. One of the main reasons to set up a new configuration with new servers is to provide a clean environment for the many WordPress and Omeka installations we host. We’ve had to hang on to some legacy services to support some older projects, so this will allow us to keep up to date. It will also allow me to set up Apache and PHP to run as a server user, locked down to it’s own directory. That way each of the 100+ sites won’t be able to access any other site’s content. I picked CentOS as the OS because it has cluster and GFS2 options of RedHat, but without the cost.

    Sun X2100 M2 OS Install steps

    1. Boot up with CentOS 6.x Minimal Install CD for x86_64
    2. Select the option to ‘Install or upgrade an existing system’, then hit the Enter key
    3. Skip the media test.
    4. You are now in graphic install mode.
    5. Hit Enter for ‘OK’ for ’English as the language.
    6. Hit Enter for ‘OK’ to US keyboard.
    7. Select the option to do a “Specialized Storage Devices” install
    8. Enter the computer name ‘bill.com’ or ‘ted.com’, etc
    9. Click the button to ‘Configure Network’.
      1. Eth2 seems to be the one associated with port 0 on the servers, so select that one and then ‘Add’
      2. Select ‘Connect Automatically’.
      3. Click the ‘IPv4 Settings’ tab.
      4. Choose ‘Manual’ for the ‘Method’.
      5. Enter the following for the info in ‘Addresses’.
        1. Address: 192.168.1.1
        2. Netmask: 255.255.255.0
        3. Gateway: 192.168.1.1
      6. For ‘DNS servers’, enter 192.168.1.100
      7. Then ‘Apply’
    10. Select ‘Next’ to keep the defaults for time zone and system clock.
    11. Enter a root password
    12. DRIVE PARTITION SETUP
      1. On the ‘Basic Devices’ tab, select the local drive and on the ‘Multipath Devices’ tab, select the storage array, and click ‘Next’.
      2. Select the ‘Fresh Installation’ option for a fresh install, or ‘Upgrade an Existing Installation’ to upgrade. Hit ‘Next’.
      3. Select ‘Create custom layout.’ and ‘Next’
      4. Delete all of the current LVM and other partitions.
      5. Select the free remaining drive for the local drive (should be /dev/sda). Click ‘Create’
      6. BOOT PARTITION
        1. Select ‘Standard Partition’ and click ‘Create’
        2. Set the Mount Point as /boot, the File System Type as ‘ext4’ and the Size (MB) as 500, then click ‘OK’
      7. Select the free space and click ‘Create’
      8. LVM PARTITION(NOTE: The sizes are different based on the size of the hard drives.)
        1. Select ‘LVM Physical Volume’ and click ‘Create’
        2. Select ‘Fill to maximum allowable size’ and click ‘OK’
        3. Select the new LVM partition and click ‘Create’
        4. Select ‘LVM Volume Group’ and click ‘Create’
        5. Set the ‘Volume Group Name’ as ‘Local’  then click the ‘Add’ button
        6. Set the ‘File System Type’ as swap, the ‘Logical Volume Name’ as ‘swap’ and the ‘Size(MB)’ as ‘12288’, then click ‘OK’.
        7. Click the ‘Add’ button again. Set the ‘Mount Point’ to ‘/’, the ‘File System Type’ to ext4, the ‘Logical Volume Name’ to ‘root’, and the ‘Size(MB)’ to ‘51200’. Then click ‘OK’.
        8. Click the ‘Add’ button again. Set the ‘Mount Point’ to ‘/home’, the ‘File System Type’ to ext4, the ‘Logical Volume Name’ to ‘home’, and the ‘Size(MB)’ to ‘500’. Then click ‘OK’.
        9. Click the ‘Add’ button again. Set the ‘Mount Point’ to ‘/var’, the ‘File System Type’ to ext4, the ‘Logical Volume Name’ to ‘var’, and the ‘Size(MB)’ to the remaining space available. Then click ‘OK’.
        10. Click ‘OK’
      9. Click ‘Next’ and ‘Write changes to disk’ to finish the partition creation.
    13. Leave the boot loader settings as is, and click ‘Next’
    14. Select the ‘Minimal’ option and click ‘Next’

    One of the most important things to have with servers is some form of remote management. That way you don’t need to trek down to the data center each time the server hangs while testing (and it happens a lot). For Sun systems, that means setting up the ELOM (Embedded Lights Out Manager).

    Steps to set up the Remote Console (Embedded Lights Out Manager – ELOM) for SunFire X2100 M2

    Set the SP serial port rate to 115200.

    • Log into the web based console, or through ssh via a computer on the same subnet (https://192.168.1.10) The IP is whatever the IP is set for the ELOM device. Check in BIOS for the IP.
      • Go to the Configuration tab, then the Serial Port tab.
      • Change the Baud Rate to 115200.

    Set BIOS

    IPMI Config
       Set LAN Config
       Set PEF Config
         PEF Support ........ [Enabled]
         PEF Action Global
            All of them ..... [Enabled]
         Alert Startup Discover ..... [Disabled]
         Startup Delay .............. [Disabled]
         Event Message For PEF ...... [Disabled]
       BMC Watch Dog Timer Action ... [Disabled]
       External Com Port ............ [BMC]
    Remote Access
       Remote Access ................ [Serial]
       Serial Port Number ........... [Com2]
       Serial Port Mode ............. [115200 8,n,1]
       Flow Control ................. [Hardware]
       Post-Boot Support ............ [Always]
       Terminal Type ................ [VT100]
       VT-UTF8 Combo Key ............ [Enabled]
    • Other options for the Serial Port Mode are 9600, 19200, 38400, and 57600

    Edit Linux Config Files

    Add a /etc/init/serial-ttyS1.conf file

    RedHat in EL 6, and thereby CentOS, moved to Upstart instead of Sysv, so we create a new serial-ttyS1.conf file instead of editing the /etc/inittab file.

    #  This service maintains a getty on /dev/ttyS1.
    stop on runlevel [016]
    
    respawn
    instance $TTY
    exec /sbin/mingetty $TTY

    Change grub.conf

    # grub.conf generated by anaconda
    #
    # Note that you do not have to rerun grub after making changes to this file
    # NOTICE:  You have a /boot partition.  This means that
    #          all kernel and initrd paths are relative to /boot/, eg.
    #          root (hd0,0)
    #          kernel /vmlinuz-version ro root=/dev/Logical/root
    #          initrd /initrd-version.img
    #boot=/dev/sda
    default=0
    timeout=5
    #splashimage=(hd0,0)/grub/splash.xpm.gz
    #hiddenmenu
    serial --unit=0 --speed=115200 --word=8 --parity=no --stop=1
    terminal --timeout=10 serial console
    
    title CentOS Linux (2.6.32-71.29.1.el6.x86_64)
            root (hd0,0)
            kernel /vmlinuz-2.6.32-71.el6.x86_64 ro root=/dev/mapper/Local-root \
    rd_LVM_LV=Local/root rd_LVM_LV=Local/swap rd_NO_LUKS rd_NO_MD rd_NO_DM \
    console=tty1 console=ttyS1,115200n8
              initrd /initramfs-2.6.32-71.29.1.el6.x86_64.img

    Add line to securetty

    console
    vc/1
    vc/2
    vc/3
    vc/4
    vc/5
    vc/6
    vc/7
    vc/8
    vc/9
    vc/10
    vc/11
    tty1
    tty2
    tty3
    tty4
    tty5
    tty6
    tty7
    tty8
    tty9
    tty10
    tty11
    ttyS1

    SUN SP Commands

    Connect to the ELOM by ssh into the IP address.
    ssh root@192.168.xxx.xxx

    • To power on the host, enter the following command:
      • set /SP/SystemInfo/CtrlInfo PowerCtrl=on
    • To power off the host gracefully, enter the following command:
      • set /SP/SystemInfo/CtrlInfo PowerCtrl=gracefuloff
    • To power off the host forcefully, enter the following command:
      • set /SP/SystemInfo/CtrlInfo PowerCtrl=forceoff
    • To reset the host, enter the following command:
      • set /SP/SystemInfo/CtrlInfo PowerCtrl=reset
    • To reboot and enter the BIOS automatically, enter the following command:
      • set /SP/SystemInfo/CtrlInfo BootCtrl=BIOSSetup
    • To change the IP address for the ELOM, enter:
      • set /SP/AgentInfo IpAddress=xxx.xxx.xxx.xxx
    • The default user name is root, and the default password is changeme.
      • set /SP/User/[username] Password=[password]
    • To start a session on the server console, enter this command:
      • start /SP/AgentInfo/console
      • To revert to CLI once the console has been started, press Esc-Shift-9 keys.
    • 
To terminate a server console session started by another user, enter this command:
      • stop /SP/AgentInfo/console

    Next we secure the new servers with some software updates and a firewall.

    Software Updates and installs:

    1. Edit /etc/resolve.conf
    2. nameserver 192.168.1.100
      options single-request-reopen

    3. yum install openssh-clients tcsh ksh bc rpm-build gcc gcc-c++ redhat-rpm-config acl gcc gnupg make vim-enhanced man wget which mlocate bzip2-devel libxml2-devel screen sudo parted gd-devel pam_passwdqc.x86_64 rsync zip xorg-x11-server-utils gettext
    4. disable SELinux. Edit the /etc/sysconfig/selinux file and set SELINUX=disabled.
      • Change takes affect on next reboot.
    5. Add the following lines to the /etc/vimrcfile:
      set autoindent ” auto indent after {
      set smartindent ” same
      set shiftwidth=4 ” number of space characters inserted for indentation
      set expandtab ” inserts spaces instead of tabs
      set tabstop=4 ” number of spaces the tab is.
      set pastetoggle=<C-P> ” Ctrl-P toggles paste mode
    6. Switch root shell to tcsh
      • Edit the /etc/passwdfile to have root use tcshroot:x:0:0:root:/root:/bin/tcsh
      • Edit the .tcshrcfile in root’s home.
        #  .tcshrc#  User specific aliases and functionsalias rm ‘rm -i’
        alias cp ‘cp -i’
        alias mv ‘mv -i’set prompt='[%n@%m %c]# ‘

        setenv PATH ${PATH}:/opt/sun/cam/bin

        #  Make command completion (TAB key) cycle through all possible choices
        #  (The default is to simply display a list of all choices when more than one
        #  match is available.)
        bindkey “^I” complete-word-fwd

      • Logout and back in for it to take affect.
    7. Edit /etc/hosts. Add a line with IP and domain name.
      #  Do not remove the following line, or various programs
      #  that require network functionality will fail.
      127.0.0.1 localhost localhost.localdomain localhost4 localhost4.localdomain4
      ::1 localhost localhost.localdomain localhost6 localhost6.localdomain6#  External IPs
      192.168.1.1 bill.com
      192.168.1.2 ted.com192.168.1.3 domain.com # this needs to be an IP that the cluster server can manage#  Internal IPs
      192.168.1.11 bill.localdomain bill # notice the .localdomain, this is necessary for mysql later
      192.168.1.12 ted.localdomain ted othernode # this is bill’s hosts file. othernode would be on the bill line for ted’s hosts file.
      #  ServicePort IPs
      192.168.1.21 billsp # I like to have a short name to use to connect to the service port (ELOM)
      192.168.1.22 tedsp

      #  Internal Services
      192.168.1.100 http.localdomain httpd.localdomain
      192.168.1.101 mysql.localdomain
      192.168.1.102 memcached.localdomain

    8. Run updatedb to set up the locate database.
    9. Edit password settings to allow for stricter control over passwords. This requires strong passwords or the use of passphrases.
    10. [Optional] Firefox: yum update, and then ayum install firefox xorg-x11-xauth xorg-x11-fonts-Type1There will be more you’ll need too.
      • If you get this error: process 702: D-Bus library appears to be incorrectly set up; failed to read machine uuid: Failed to open "/var/lib/dbus/machine-id": No such file or directory. Then run the following command as root.
        • dbus-uuidgen > /var/lib/dbus/machine-id
    11. Set up ssh keys
      • ssh-keygen
      • Copy the id_rsa.pub file to the other node
      • Copy the contents of id_rsa.pub to cat id_rsa.pub >> ~/.ssh/authorized_keys
      • Double check permission on authorized_keys and id_rsa both set to rw-------
      • You should now be able to log in from bill to ted (and vice versa) without a password.


    Shorewall

    • Yum Install:
      • Get EPEL repository. Visit http://fedoraproject.org/wiki/EPEL to get the URL for the correct rpm. Something like: epel-release-6-5.noarch.rpm.
      • Copy that URL and runrpm -Uvh http://download.fedoraproject.org/pub/epel/6/i386/epel-release-6-5.noarch.rpmon the machine.
      • Edit the /etc/yum.repos.d/epel.repo file and set the first “enabled” line to equal 0. That disables yum from using the EPEL repo by default.
      • Install shorewall with yum.yum --enablerepo=epel install shorewall
    • Enable program to run by editing the /etc/shorewall/shorewall.conf file. Change the STARTUP_ENABLED=NOtoSTARTUP_ENABLED=Yes
    • Edit the shorewall config files.
    • Edit the /etc/shorewall/zonesfile:
      • #
        #  Shorewall version 4 – Zones File
        #
        #  For information about this file, type “man shorewall-zones”
        #
        #  The manpage is also online at
        #  http://www.shorewall.net/manpages/shorewall-zones.html
        #
        ###############################################################################
        #ZONE TYPE OPTIONS IN OUT
        #  OPTIONS OPTIONSnet ipv4 # The big bad Internet
        loc ipv4 # Internal LAN
        fw firewall#LAST LINE – ADD YOUR ENTRIES ABOVE THIS ONE – DO NOT REMOVE#LAST LINE – ADD YOUR ENTRIES ABOVE THIS ONE – DO NOT REMOVE
    • Edit the /etc/shorewall/interfacesfile:
      • #
        #  Shorewall version 4 – Interfaces File
        #
        #  For information about entries in this file, type “man shorewall-interfaces”
        #
        #  The manpage is also online at
        #  http://www.shorewall.net/manpages/shorewall-interfaces.html
        #
        ###############################################################################
        #ZONE INTERFACE BROADCAST OPTIONS
        net eth2
        loc eth1
    • Edit the /etc/shorewall/policyfile:
      • ###############################################################################
        #SOURCE DEST POLICY LOG LIMIT: CONNLIMIT:
        #  LEVEL BURST MASK
        #  To/from internal lan
        fw loc ACCEPT
        loc fw ACCEPT
        #  To/from net
        fw net ACCEPT
        net all DROP info
        #
        #  THE FOLLOWING POLICY MUST BE LAST
        #
        all all REJECT info
        #LAST LINE — DO NOT REMOVE
    • Edit the /etc/shorewall/rulesfile:
      • ######################################################################################
        #ACTION SOURCE DEST PROTO DEST SOURCE ORIGINAL
        #  PORT PORT DEST
        #SECTION ESTABLISHED
        #SECTION RELATED
        SECTION NEWSECTION NEW#  Standard services
        #
        ACCEPT  net      fw      tcp     ssh
        ACCEPT  net      fw      tcp     80,443Ping/ACCEPT      net      fw

        #LAST LINE — ADD YOUR ENTRIES BEFORE THIS ONE — DO NOT REMOVE

    • Edit the /etc/shorewall/routestoppedfile:
      • #
        #  Shorewall version 4 – Routestopped File
        #
        #  For information about entries in this file, type “man shorewall-routestopped”
        #
        #  The manpage is also online at
        #  http://www.shorewall.net/manpages/shorewall-routestopped.html
        #
        #  See http://shorewall.net/starting_and_stopping_shorewall.htm for additional
        #  information.
        #
        ###############################################################################
        #INTERFACE HOST OPTIONS PROTO DEST SOURCE
        PORT PORT
        eth1     –
        eth2     –
    • Set shorewall to start on reboots.chkconfig shorewall on
    • Start shorewall:service shorewall start

    The next part will be connecting the servers to the storage array.

    Writing is like carving in stone

    Cross posted at NaziTunnels.org.

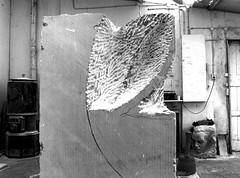
    Like a block of stone

    MAY 3. 2007: THE STONE IS WAITING

    I recently finished writing and rewriting and writing again the essays for several scholarship applications. It is probably a good thing, but that was the most time and effort I have ever spent writing three pages of text. I went through several revisions of each essay, had the wonderful Fulbright advisers at George Mason read and reread the essays, and even went to the vastly underused (by me anyways) campus writing center.

    Roughing it out

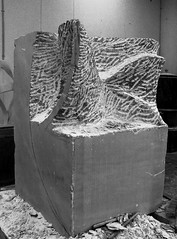
    MAY 16. 2007 : DAY 14

    My personal essay started out as being a little too personal, as in informal. At the writing center, I also realized that the opening paragraph was too negative. I wanted to show how as a child I deeply disliked school. In first and second grades, in order to avoid going to school I would often hide in the backyard or somewhere in the house, and generally make a big stink every morning. One time my mom drove me to school (two blocks away) and when we got there I jumped out of the car and ran off into the neighborhood for an hour or so. The rest of elementary school through high school was better; I did not put up as much of a stink, but I still did not like school. I was convinced that I would never have anything to do with school again once I graduated from high school. That’s how my essay started out, a general idea of what I wanted to write about. Like a big block of stone that I hacked away at.

    Adding Detail

    MAY 22. 2007: DAY 20

    I wanted to convey all of that in a couple of sentences, all to point to the irony that I am now pursuing the highest degree one can attain in school, and that I am still in school 16 years later, with another three years to go (I did have three years off in there, though). But the gal at the writing center was right. It was a bit too negative. Instead I focused on my strengths as an historian and my technical skills. This worked out much better, since this is one of the major focuses of the dissertation. Through this constant revision and insight from others my project started to take shape.

    Finishing
    FINISHED AND ON ITS PLACE

    One of the other really neat things about spending so much effort on an essay (especially one about my dissertation research) is that I was really able to focus my arguments and tighten up my thoughts on what I hope to accomplish. Through this process of constant revision I realized three things that I wanted to focus on in my dissertation: the story of the underground dispersal projects; how the projects are memorialized or not, and what that says about Vergangenheitsbewältigung; and an argument for the change in what is considered scholarship in the historical profession. Going through the constant revisions has changed my focus in some small ways from my original proposal in the dissertation prospectus, but that is to be expected. I feel that I now have a much more polished and obtainable goal.

    All images courtesy of Akbar Simonse, who photographed Mark Rietmeijer sculpture. http://www.flickr.com/photos/simeon_barkas/sets/72157600224554402/

    CentOS 6, iDrac6 and PowerEdge R510

    1. RedHat changed an important part of their system with the upgrade from version 5 to 6. This affects CentOS which is the same thing, but rebranded.

    I was updating one server to use CentOS 6, and ran into this issue of setting up the iDRAC for remote console use. In previous versions, I would add a line to the /etc/inittab file. This is now unused. RedHat is favoring the “Upstart” system developed by and for Ubuntu. It starts services on request, rather than all at once.

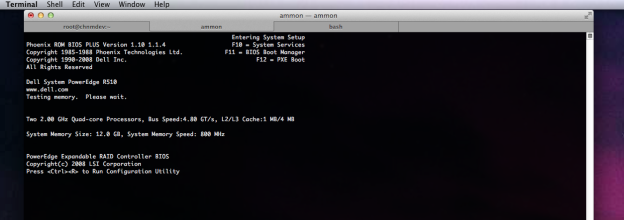
    So here is how I set up my Dell PowerEdge R510 with CentOS 6 to use the iDRAC6.

    Info was taken from the RedHat manual, the Dell iDRAC manual, and probably a bunch of other sites that I googled for.

    These steps are by no means comprehensive or detailed. I barely even know what’s going on myself, but it seems to work. It’s kind of cool to see a system boot up in your terminal. It’s like your terminal turns into a monitor connected to the server.

    Setting up the iDrac6

    Edit BIOS

    1. Boot the server.
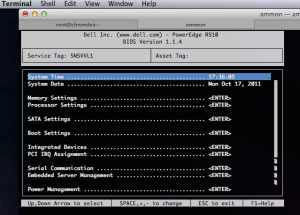
    2. Press F2 to enter the BIOS setup utility during POST.
    3. Scroll down and select Serial Communication by pressing <Enter>.
    4. Set the Serial Communication screen options as follows:
      • serial communication....On with serial redirection via com2
      • NOTE: You can set serial communication to ‘On with serial redirection via com1’ as long as the serial port address field, serial device2, is set to com1, also.
      • serial port address....Serial device1 = com1, serial device2 = com2
      • external serial connector....Serial device 1
      • failsafe baud rate....57600
      • remote terminal type....vt100/vt220
      • redirection after boot....Enabled
    5. Save the changes and exit.

    Edit iDRAC settings

    1. Turn on or restart your system.
    2. Press <Ctrl><E> when prompted during POST. If your operating system begins to load before you press <Ctrl><E>, allow the system to finish booting, and then restart your system and try again.
    3. Configure the LOM.
    1. Use the arrow keys to select LAN Parameters and press <Enter>. NIC Selection is displayed.
    2. Use the arrow keys to select one of the following NIC modes:
      • Dedicated — Select this option to enable the remote access device to utilize the dedicated network interface available on the iDRAC6 Enterprise. This interface is not shared with the host operating system and routes the management traffic to a separate physical network, enabling it to be separated from the application traffic. This option is available only if an iDRAC6 Enterprise is installed in the system. After you install the iDRAC6 Enterprise card, ensure that you change the NIC Selection to Dedicated. This can be done either through the iDRAC6 Configuration Utility, the iDRAC6 Web Interface, or through RACADM.
    • Configure the network controller LAN parameters to use DHCP or a Static IP address source.
    1. Using the down-arrow key, select LAN Parameters, and press <Enter>.
    2. Using the up-arrow and down-arrow keys, select IP Address Source.
    3. Using the right-arrow and left-arrow keys, select DHCP, Auto Config or Static.
    4. If you selected Static, configure the Ethernet IP Address, Subnet Mask, and Default Gateway settings.
    5. Press <Esc>.
    • Press <Esc>.
    • Select Save Changes and Exit.

    Set up Linux OS (to do after OS is installed)

    • Configuring Linux for Serial Console Redirection During Boot
    • The following steps are specific to the Linux GRand Unified Bootloader (GRUB). Similar changes would be necessary if you use a different boot loader.
    • NOTE: When you configure the client VT100 emulation window, set the window or application that is displaying the redirected console to 25 rows x 80 columns to ensure proper text display; otherwise, some text screens may be garbled.
    1. Make a copy of the /boot/grub/grub.conffile as follows:cp /boot/grub/grub.conf /boot/grub/grub.conf.orig
    2. Edit the /boot/grub/grub.conf file as follows:
    1. Locate the General Setting sections in the file and add the following two new lines:serial --unit=0 --speed=57600terminal --timeout=10 serial console
    2. Append two options to the kernel line:kernel ............. console=ttyS1,57600 console=tty1
    3. If the /etc/grub.conf contains a splashimage directive, comment it out.Sample File: /boot/grub/grub.conf
      #  grub.conf generated by anaconda
      #
      #  Note that you do not have to rerun grub after making changes to this file
      #  NOTICE: You have a /boot partition. This means that
      #  all kernel and initrd paths are relative to /boot/, eg.
      #  root (hd0,0)
      #  kernel /vmlinuz-version ro root=/dev/Logical1/LogVol00
      #  initrd /initrd-version.img
      #boot=/dev/sda
      default=0
      timeout=5
      #splashimage=(hd0,0)/grub/splash.xpm.gz
      #hiddenmenu
      serial –unit=1 –speed=57600
      terminal –timeout=5 console serialtitle CentOS (2.6.18-164.11.1.el5) SOL Redirection
      root (hd0,0)
      kernel /vmlinuz-2.6.18-164.11.1.el5 ro root=/dev/Logical1/LogVol00 console=tty1 console=ttyS1,57600
      initrd /initrd-2.6.18-164.11.1.el5.img
      title CentOS (2.6.18-164.el5)
      root (hd0,0)
      kernel /vmlinuz-2.6.18-164.el5 ro root=/dev/Logical1/LogVol00
      initrd /initrd-2.6.18-164.el5.img

    Enabling Login to the Console After Boot

    1. Create a new /etc/init/serial-ttyS1.conffile.Sample File: /etc/inittab
      #  This service maintains a getty on /dev/ttyS1.start on stopped rc RUNLEVEL=[2345]
      stop on starting runlevel [016]respawn
      exec /sbin/agetty -h -L 57600 ttyS1 vt102

    Edit the file /etc/securetty

    1. Make a copy of the /etc/securettyfile as follows:cp /etc/securetty /etc/securetty.orig
    2. Edit the file /etc/securettyas follows:Add a new line with the name of the serial tty for COM2:ttyS1Sample File: /etc/securetty
      vc/1
      vc/2
      vc/3
      vc/4
      vc/5
      vc/6
      vc/7
      vc/8
      vc/9
      vc/10
      vc/11
      tty1
      tty2
      tty3
      tty4
      tty5
      tty6
      tty7
      tty8
      tty9
      tty10
      tty11
      *ttyS1*

    Redirect the video output over ssh connections

    Starting a Text Console Through SSH (Remote Access, SOL)

    To connect to the managed system text console, open an iDRAC6 command prompt (displayed through an SSH session):

    ssh root@xxx.xxx.xxx.xxx

    and type:

    console com2

    Only one console com2 client is supported at a time. The console -h com2 command displays the contents of the serial history buffer before waiting for input from the keyboard or new characters from the serial port.

    To exit the console type these three keys: <Ctrl ><Shift >\

    The default (and maximum) size of the history buffer is 8192 characters. You can set this number to a smaller value using the command:

    racadm config -g cfgSerial -o cfgSerialHistorySize < number >

    Making SMF static

    We have a few legacy forums powered by the good software SMF (SimpleMachines Forum). Like many of the WordPress installs, it’s a pain and a security risk to keep these up-to-date when they are no longer needed as content creation platforms. So, once again I need to convert a web app into static HTML pages. This process proved a bit harder than converting WordPress to static HTML.

    Step 1: Upgrade

    The first thing to do is update to the latest version. This ensures that if you need to turn this back into a dynamic site, it should hopefully be compatible with whatever the latest version is at that time.

    Step 2: Make it public

    Next, we’ll need to make it public to guests, so that wget has access to the pages.

    Go to the Admin->Features and Options page and check the “Allow guests to browse the forum” box, then click save. Now we have to change the permissions on each board separately. Or with a bit of MySQL magic, we can change them all at once using the CONCAT operator. Open of phpMyAdmin, or something else of your choice. Before we mess with the data, make a copy of the table, just in case we totally hose it.

    Browse to the ‘boards’ table, and then to the SQL tab. We’re going to enter an SQL command that will pre-pend (that’s append but onto the front rather than the end) some data.

    UPDATE boards SET member_groups=CONCAT('-1,', member_groups) WHERE 1


    This will add a -1, to the beginning of each field, which makes the board viewable by guests. No need to log in, which means wget can scrape the pages and turn them into HTML.

    Step 3: Edit Theme files

    Now we get to play around with the theme files to get rid of forum specific items that we won’t need, like links to member info, the login, help, and search links, and anything else that we don’t want.

    Here are some items to delete or alter, and the files I found them in for our home-made theme based off of an old default theme.

    index.template.php

    • Add a title
    • Get rid of date stamp
    • Get rid of the main menu (Home, Help, Search, Login, etc)

    BoardIndex.template.php

    • Search for [‘member’][‘link’] and change it to [‘member’][‘name’] This will take out all links to member profile pages.

    Display.template.php

    • Search for [‘member’][‘link’] and change it to [‘member’][‘name’] This will take out all links to member profile pages.
    • Get rid of the drop down menu to select pages.

    MessageIndex.template.php

    • Search for [‘member’][‘link’] and change it to [‘member’][‘name’] This will take out all links to member profile pages.
    • Delete the ‘Jump to’ drop-down box and the icons explaining post/board types

    Step 4: Fix the URLs

    As it stands, SMF has some pretty ugly URLs. There are a couple of mods that I could never get to work. But editing a file and adding an .htaccess file seems to do the trick.

    Open the Sources/QueryString.php file and look for the line like this:

    $scripturl = $boardurl . '/index.php';

    and get rid of the /index.php

    Now create a .htaccess file in the root of the forum (in the same folder as the Settings.php file). It should look similar to this:

    RewriteEngine On
    RewriteBase /7tah/forum/
    RewriteCond %{REQUEST_FILENAME} !-f
    RewriteCond %{REQUEST_FILENAME} !-d
    RewriteRule . /7tah/forum/index.php [L]


    Step 5: Wget it

    Now we run wget on the command line to grab the pages.

    wget --mirror -P static-forum -nH -np -p -k -E --cut-dirs=2 http://domain.com/path/forum/

    All of the static HTML files will now be located in a directory called static-forum.

    Step 6: Fix filenames

    Some filenames will be a bit broken. Specifically the style.css has an extra “?fin11” in the html files where the file is called. Also, it get’s name that way. So fix that by changing the name of the file to just style.css (it’s in your Theme directory). Then run this one-line command to search and replace throughout all of the static html files (run the command when you are in the static-forum directory.

    find . -name '*.html' -type f -exec perl -pi -e 's/style.css%3Ffin11/style.css/g' {} \;


    This will look for all of the references to the style.css%3Ffin11 file and change them to style.css. Then the pretty colors and formatting will work. Just for clarification, the %3F is code for a question mark. It shows up as such in the HTML source when viewing from a browser, but is displayed as such in the actual code.

    Don’t forget to change the the actual name of the css file to style.css.

    Step 7: Protect it

    Depending on  your needs, you may want to password protect your new static forum with an htaccess account. The good peoples at Dynamic Drive have an helpful tool for making the two files necessary to make this happen. Just plug in your desired user name, password, and location of the htpasswd file, and then it’s copy and paste into those files on the server.

    I change the last line of the htaccess file to require user username so that it works only with the given user, not any valid. But since it only pulls from the specified htpasswd file, it’s kind of pointless.

    Step 8: Backup the old

    It’s a good idea to make a backup of the database and site files before getting rid of them. I just make a mysqldump of the database, throw it in the forum folder, and then make a tar or zip file of that and put the file in the new static forum folder for safe keeping.

    Step 9: That’s it.

    Sit back and relax. Your forum is interactive no longer.

    Carl Edwin Shepherd – April 30, 1949 – August 8, 2011

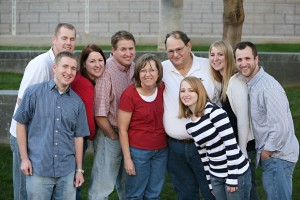
    My parents and siblings in 2008

    My dad passed away kind of unexpectedly a few weeks ago. He was diagnosed with liver cancer (although he never drank a drop of alcohol) about two years ago. At that time he was given a year or two to live. For the past year or so, he was in and out of the hospital for treatments and other health issues. We thought his last trip to the hospital was just another one of those in and out visits. He got cellulitisin July, and that severely dehidrated his body, which

    started to shut down his kidneys. By the beginning of August he was in the hospital again, and there was nothing they could do for him. All of his seven children and their families came back to Mesa, Arizona as quickly as we could. Unfortunately, my dad passed away the night before I got there. When I learned that he died, it was the first time I had really cried since I was a kid.

    The funeral and everything went very well. The friends from my parents Ward were awesome and supplied us with ample and very yummy food, so that we didn’t have to worry about feeding the 28 or so people that were always at my parents house. I was asked to give the life sketch of my dad at the funeral. It was not all inclusive, or even all that detailed, but it expresses what my dad was: a simple, humble, loving father and husband, who tried to do what was right.

    Here’s the life sketch:

    Life Sketch of Carl Edwin Shepherd


    Dad was born April 30, 1949 in Mesa, Arizona, to Max and Lois Shepherd.

    He received his Eagle Scout award, graduated from Mesa High School, and served a mission to Southern Germany. His life “took a major change” after meeting a girl at a Church dance. After the first date he was “hooked for life”. Ed and Cathy were married on February 16th, 1973.


    He died August 8, 2011, in Mesa, Arizona. His father and a younger brother preceded him in death, and he left behind his mother, his wife, seven children and fourteen grandchildren.


    In between those dates and events the world was forever changed by the life and love of the great man we honor and remember today.


    Life Protected

    My Dad’s life was protected, even from his earliest days. When he was still a baby, he was in his crib for a nap. His mother was visiting with a neighbor, when she felt the distinct impression to go check on him. She followed the impression and when she went to the crib, my dad’s head was wedged between the crib and mattress, and was already nearly strangled.

    When two years old, he was putting on his sandals, and was bit by a scorpion. He was in convulsions by the time he got to the hospital, but was able to get treated and was only sick for several days.

    Dad was protected in other ways as well. He had many experiences that helped him learn the truth and power of God, and the plan He had for my Dad. Once as boy, he was tempted to drink alcohol when he found a bottle of liquor on his way home from school. He purchased a Slurpee from the store, poured the liquor in and was about to take a drink when the cup flew from his hand. He felt impressed that if he ever took a drink he would never be able to put it down. This experience helped him live the Word of Wisdom through out his life.

    As it says in D&C 89: 21, “And I, the Lord, give unto them a promise, that the destroying angel shall pass by them, as the children of Israel, and not slay them. Amen.” On Dec 17, 1988, Dad’s arm got stuck in a lathe at work, and broke in four places above the elbow. “The Lord was watching over me that day,” he wrote in his journal, “because it would have been so easy for the lathe to have ripped my arm clear off or done far more damage than it did.”  Dad’s brother Paul, who worked at the same shop, remarked on how much of a miracle it was. The only way the machine would stop was for someone to push the off button. With Dad stuck in the lathe there was no time and he was in no position to have done it, but the machine stopped before any more damage could be done. The Lord was definitely there to help out. Charity recalled that it was a blessing in disguise for Dad to be home so much to help take care of Charity and get to know her better. Shortly after the accident, his father Max Shepherd, blessed him that he would “heal quicker than normal and that this would be a testament to his family because he had never used drugs, alcohol, tobacco and had kept his body clean.” Indeed, this was a testimony to his family. The destroying angel had passed him by on this and many other occasions. Even though Dad died of ill health, it was not the destroying angel that came to take him away but it was an angel of compassion and love.


    Worthy Priesthood Holder

    Three generations. Asher shares his grandpa's birthday.

    Dad emulated scriptures in many ways. My Dad was a humble servant and worthy priesthood holder, and surely one of the chosen of God. One of the great scriptures detailing the rights and responsibilities of the priesthood is found in D&C 121: 40-44. “Hence many are called, but few are chosen. No power or influence can or ought to be maintained by virtue of the priesthood, only by persuasion, by long-suffering, by gentleness and meekness, and by love unfeigned; By kindness, and pure knowledge, which shall greatly enlarge the soul without hypocrisy, and without guile—Reproving betimes with sharpness, when moved upon by the Holy Ghost; and then showing forth afterwards an increase of love toward him whom thou hast reproved, lest he esteem thee to be his enemy; That he may know that thy faithfulness is stronger than the cords of death.” Of course I never needed reproving, but my siblings tell me this was my Dad’s way. J  Rarely would he yell, and then usually at the situation and not the individual. Ben remembers many times where Dad exemplified this eternal priesthood pattern, especially after Ben learned that our suburban was not only good for carrying people but for mud bogging, jumping out of retention basins, and all manner of shenanigans. After one such occasion the car would not start. My Dad found the problem, then asked Ben to come out to the car. Instead of yelling or getting mad, my Dad showed Ben how to clean the mud from the starter and get the car working again. He ended with his expression of love for Ben. Such was the pattern over and over again. Dad was quick with reprove, by story or explanation, and followed up with a show of love.

    When Aaron was pre-school aged, he found a drill in the back yard that Dad had borrowed from our Grandpa. He started drilling holes in the dirt. After a few minutes Dad came out, asked him to stop, then went back inside. After he left, Aaron promptly forgot, and started drilling again. Dad came out and again asked him to stop. As soon as Dad went back inside, Aaron started drilling again. For the third time Dad came out. Aaron knew he was in trouble and expected it. Dad patiently picked up Aaron, brought him into the living room and sat him on the couch. He told Aaron he loved him, and then went back to what he was doing.

    Dad reproved with sharpness at times, but always let us know that he loved us, and we know undeniably that his faithfulness is stronger than death.


    Dad loved serving in the Church. He had many callings, but the ones he wrote most of were the ones where he got to serve others the most, such as being a Stake Missionary, a Teachers Quorum Advisor while my brother Aaron and I were Teachers, and the Stake calling to be in charge of our building. I have many fond memories of helping him get the Stake Center satellite and recording equipment ready for General Conference. Two special times were right before my mission and right after. I could tell my Dad honored and sustained the Prophet and Apostles by his dedicated service in the Church. He taught all of us boys the “right way” to help with chairs at any Church function. 10 in a row, all facing the same way, evenly stacked on each side of the cultural hall.


    Dad’s love

    Dad showed us love in so many ways. In a letter he wrote to Ben after his mission, he expressed the need for people to be shown love in different ways. “Consider the needs of each child separately, for just as adults are different, each child is different also. Each must be treated different. There are huggers and tell me but touch me nots. Some will learn from a lecture or a story, others need a more physical approach. Each needs to know that you truly love them for who they are, children of God on loan to two other children who have a few more minutes of experience.”

    Even after getting up really early, and doing demanding physical work during the day, Dad would sing us to bed, or read us stories like the Hobbit and the Lord of the Ring trilogy.

    Dad was so excited when Charity made the Cheerleading team. “Great!” he said, “I get to go to all the football games… to see you of course.”

    Dad was always building stuff for us: a big fort in the back yard (he kept it a surprise by telling us it was a show case for his prize elk rack). He built a loft bed for our room (this was especially memorable for me, I even cried the day the family took it out). He built a couch to store our year supply, and an entertainment center out of a piano crate. He built rocking horses, and wooden guns.

    Dad would make dinner everyday while Mom was giving piano lessons, and he would open the car door for Mom. On the occasions when he was home for breakfast, he would make pancakes or waffles with strawberries and whipped cream. These examples have become natural for his own sons, as they emulate his good example of service and love to his family.

    More recently, when we would visit for Christmas, if ever we mentioned we needed something (like baby food), the next day there would be a month supply.


    Remembrances

    We’ll always remember you Dad. Your collection of suspenders. Your garden and other yard projects. Your collecting quarters. Trips to the desert for picnics and shooting guns, and your amazing knowledge of plant life, wildlife and geology. The vast amounts of seemingly trivial trivia. If only we could have convinced you to be on Jeopardy, Ken Jennings would have met his match. We’ll miss your wonderful tenor singing. We’ll miss your cooking. Most of all we’ll miss your love and companionship.


    This is but a sad temporary parting, for our hope in eternal life and the beautiful plan of salvation made possible by our loving and merciful Savoir, allows us to hope for a better day, when we will all be reunited and have eternal life with God our Father and His Son Jesus Christ, whom we can all seek to emulate.