
Login Using Session
Introduction
If you have an account with any web site, at some point you have "Logged In" to your account. What you may not know is that to login you are probably using a "session". Let's start this activity with a brief explanation.
What is a Session?
Without being too technical, a session is a block of the web server's memory that is set aside for temporarily storing and retrieving data as the web server or web application and the browser interact. Each session is assigned a unique ID by the server so that the browser and server know which session they are working with and the session ID is placed in a "session cookie". The cookie is sent to the browser by the server, and the cookie is returned to the server with every request.
Remember! The session cookie only contains the session id. It is NOT the session itself!
Stateless
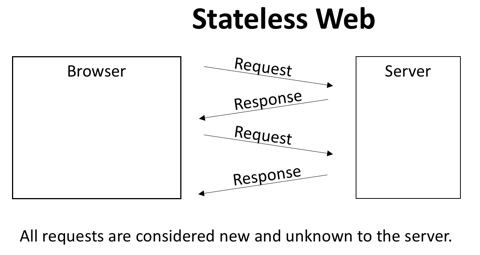
Without a session id being passed back and forth, the server is unaware that a particular browser request could be a follow-up to a previous request. To the server each request is "new" and the browser making the request is "unknown". This is referred to as the "Stateless" web because the "conversation" between the browser and server is not tracked. This is illustrated below:
Stateful
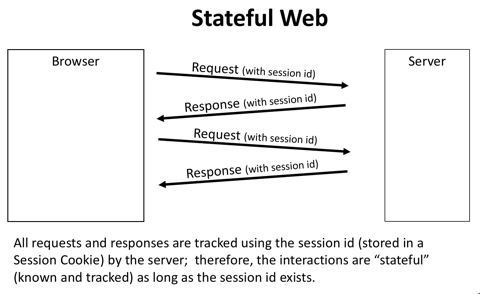
When a session is created and a session id is stored into a session cookie and sent to the browser, then the ability of the server to "know" that the browser is interacting with the server is established. This is known as being "stateful" or "maintaining state", meaning that the browser requests are associated with a particular session id and the server can track the interactions. This is illustrated below:
Why is this important?
When a visitor "logs in" to a web site, they expect to only do so once, until they end that particular interaction with the site. In order for the server to remember the user, a session must be created so the interactions between the visitor's browser and the server can be "maintained". If this didn't happen, then the visitor would have to login every time a new view needed to be viewed if that view required a login.
Video Demonstration
Note: The names shown below may not match your variable, file, folder or function names. Use your names.
The Login Process
Hopefully you now have a better understanding of the critical role that the session plays and the need to maintain state, particularly when a visitor "logs in". Yes!? Okay, let's get started using a session and building a login process:
Session Creation
- Open the phpmotors controller (index.php at the phpmotors root).
- Near the top of the page (below the default comment and above the block of
require_once()statements) add a few new lines. - Add this comment and code in the new lines:
As indicated by the comment, if there is no session, one is created. Otherwise, the existing session is used.// Create or access a Session session_start(); - Save the file and start the Apache and MySQL servers.
- Run the phpmotors controller.
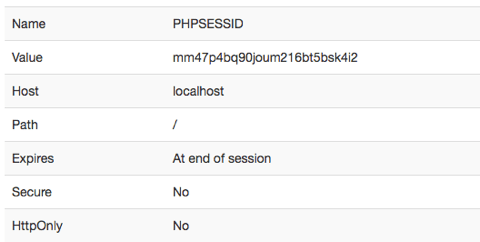
- The phpmotors home view should appear. If you have the "Web Developer" tool available in your browser (Chrome or FireFox), select "Web Developer > Cookies > View Cookie Information". You should see a list of
cookies and in the list should be a "PHPSESSID" cookie with a value that is a mixture of letters and numbers that is about 20 characters in length:
- Add the same session creation code to all of the controllers within the PHP Motors site.
-
VERY IMPORTANT: You must use the MVC strictly for this to work. All views send requests to controllers, which process the requests and deliver views. Only by remembering this will the sessions be maintained.
Using this MVC architecture means that you will NEVER enter a URL in the browser with the 'view' folder: http://localhost/phpmotors/view/filename.php
Instead, all of the files in the view folder are accessed through the controller; either
- Main Controller:
- http://localhost/phpmotors/index.php?action=something or
- http://localhost/phpmotors/?action=something
- Accounts Controller:
- http://localhost/phpmotors/accounts/index.php?action=selection or
- http://localhost/phpmotors/accounts/?action=selection
- Vechicles Controller:
- http://localhost/phpmotors/vehicles/index.php?action=options or
- http://localhost/phpmotors/vehicles/?action=options
- Main Controller:
Login View
We will now make sure the login view is sending the login information to the "accounts" controller.
- Locate and open the login.php view.
- Find the opening
<form>tag. - The form tag must have a
methodandactionattribute. - The value of the
methodmust be "post". - The value of the
actionmust point to the accounts folder (e.g. "/phpmotors/accounts/"). For example:
Remember that "index.php" is a default name on the server. If we don't specify a file name, the server will look for a default name and direct inputs to it.<form method="post" action="/phpmotors/accounts/"> - Scroll down and make sure that the form contains a hidden input with a name of "action" and a value of "Login" (or something similar). For example:
<input type="hidden" name="action" value="Login"> - Save the view, but leave it open.
The Accounts Model
The model is responsible for handling the database interactions. To login we will need a new function that will do multiple tasks for us.
- Find and open the accounts model - "accounts-model.php".
- Scroll to the bottom of the existing functions and add the following new function:
// Get client data based on an email address
function getClient($clientEmail){
 $db = phpmotorsConnect();
 $sql = 'SELECT clientId, clientFirstname, clientLastname, clientEmail, clientLevel, clientPassword FROM clients WHERE clientEmail = :clientEmail';
 $stmt = $db->prepare($sql);
 $stmt->bindValue(':clientEmail', $clientEmail, PDO::PARAM_STR);
 $stmt->execute();
 $clientData = $stmt->fetch(PDO::FETCH_ASSOC);
 $stmt->closeCursor();
 return $clientData;
}
An Explanation
Most of this code should look familiar, but I will touch on things that may not:
- We will extract all of the client data, but not use all of it at once. But, by getting it all, we don't have to make a second query if our initial check of the password in the controller is successful.
- We expect a single record to be returned, thus the use of the
fetch()method. - To return a simple array using the database field names as the "name" in the "name -
value" pair of the client data we pass in the
PDO::FETCH_ASSOCparameter. - Assuming that you send an email address to the function and a database record with that
email is found, the array sent back could look like this:
Because the password hash is so long, I have cut it off and placed ... at the end. Your returned password hash should be full size.Array ( [clientId] => 14 [clientFirstname] => Bill [clientLastname] => Hickock [clientEmail] => wildbill@ok.com [clientLevel] => 1 [clientPassword] => $2y$10$BhuiPAAubX... )
- Save the model file.
The Accounts Controller
The bulk of the login work happens in the controller, so let's get started.
- Find and open the accounts controller (accounts > index.php).
- If you haven't already, make sure the controller uses PHP sessions. Just as you did with the main controller, add code to start the session. This code should go at the top of the file, below the comment that notes what this file does. This should go in the vehicles controller, too (vehicles > index.php).
session_start(); - Now, look at your switch control structure.
- Find the case statement that matches the hidden input value that you just verified is in the login view. For example:
case 'Login': ... break; - Within this case statement we will add the login process code. To review, the typical process will follow these steps:
- Collect and filter the incoming data.
- Check that none of the values are missing (after filtering).
- If data is missing, send it back to the view for error correction.
- If the data is complete, process it.
- Check the result of the processing and send a view to the browser to inform the site visitor.
Login Processing
Add all of the code below inside the case statement mentioned above:
$clientEmail = trim(filter_input(INPUT_POST, 'clientEmail', FILTER_SANITIZE_EMAIL));
$clientEmail = checkEmail($clientEmail);
$clientPassword = trim(filter_input(INPUT_POST, 'clientPassword', FILTER_SANITIZE_FULL_SPECIAL_CHARS));
$passwordCheck = checkPassword($clientPassword);

// Run basic checks, return if errors
if (empty($clientEmail) || empty($passwordCheck)) {
 $message = '<p class="notice">Please provide a valid email address and password.</p>';
 include '../view/login.php';
 exit;
}

// A valid password exists, proceed with the login process
// Query the client data based on the email address
$clientData = getClient($clientEmail);
// Compare the password just submitted against
// the hashed password for the matching client
$hashCheck = password_verify($clientPassword, $clientData['clientPassword']);
// If the hashes don't match create an error
// and return to the login view
if(!$hashCheck) {
  $message = '<p class="notice">Please check your password and try again.</p>';
  include '../view/login.php';
  exit;
}
// A valid user exists, log them in
$_SESSION['loggedin'] = TRUE;
// Remove the password from the array
// the array_pop function removes the last
// element from an array
array_pop($clientData);
// Store the array into the session
$_SESSION['clientData'] = $clientData;
// Send them to the admin view
include '../view/admin.php';
exit;
An Explanation
- The
checkEmail()function sanitizes the email string and then validates that it is a valid email. If it is, the valid email is returned, but if not "NULL" is returned. - The
checkPassword()function checks that the password meets the requirements for our password and returns a "1" if it does or a "0" if it doesn't. - We then run basic checks on the variables and if errors are found, the login.php view is included so the errors can be fixed.
- If no errors are found, the potential matching client data is queried from the database using the submitted email address.
- When the password was stored in the database it was hashed using the
password_hash()function. Since the hash cannot be "un hashed" we have to use a different PHP function to hash the new password and compare the two hashes to see if they match. - The
password_verifyfunction has the ability to hash the new password using the same information as when the original password was hashed, but using the new password. If the passwords were the same, the hashes should match and we know that we have a valid login. The results of this check are stored into$hashCheck. - In the event that the hashed passwords do not match (
$hashCheckis FALSE) we report back to the client using an error message in the login.php view. - If the
$hashCheckis not FALSE, the we have a valid email and password and the clientData is good to go. We now login the site visitor by:- Creating a "flag" in the session named "loggedin" with a value of TRUE.
- We remove the password from the
$clientDataarray using the PHParray_pop()function. - We then store the
$clientDataarray into the session using the same name "clientData" so we can use it when needed. - Finally, we send the logged in site visitor to the admin.php view (this view will be created as part of the enhancement).
The $_SESSION
The PHP $_SESSION is a "super global" variable. This means that it is universally available throughout all PHP code. It also behaves like an associative array. That means that when you write code like this:
$_SESSION['loggedin'] = TRUE;echo $_SESSION['loggedin'];
// result would be "1"if(isset($_SESSION['loggedin'])){
// do something here if the value is TRUE
}if(!isset($_SESSION['loggedin'])){
// do something here if the value is FALSE
// The exclamation mark is a "negation" operator
// By adding it the resulting test is reversed
// This test is now "If Session loggedin value is NOT true"
}It also means that if you write code like this to store an array into the session:
$_SESSION['clientData'] = $clientData;echo $_SESSION['clientData']['clientFirstname'];$clientLastname = $_SESSION['clientData']['clientLastname'];If needed, go back and review Associative and Multi-dimensional arrays as referenced in week 06.
Update the Registration Case
Until now, we haven't addressed the possibility of resubmitting forms and causing duplicate entries by mistake. We're going to solve that now for the registration process.
- Open the Accounts Controller.
- Go to the Registration case (the case that actually processes the registration).
- We will make two changes here:
- Change the line where we create the success message. Instead of storing the message to a variable, store it to the session, like so:
$_SESSION['message'] = "Thanks for registering $clientFirstname. Please use your email and password to login.
"; - Change the line where we include the login form after a successful registration to:
header('Location: /phpmotors/accounts/?action=login');
- Change the line where we create the success message. Instead of storing the message to a variable, store it to the session, like so:
Set the $message to the $_SESSION
Messages can be stored in a variable as we have been doing or they can be stored in the $_SESSION, as we did just now in the registration process. It's common for messages to be stored in the $_SESSION. But once stored in the session, we must alter how we get the value out of the session to display it. To do this, open the login.php view and find the message detection and display code block. It should be similar to the code below:
if (isset($message)) {
 echo $message;
}
Now we will get the message from the session in order to display it:
if (isset($_SESSION['message'])) {
 echo $_SESSION['message'];
}
Your login view will now capture and show the successful registration message from the controller.
Difference between header() and include()
Throughout the course we have used both header() and include() and you may have wondered, "What is the difference, when do I use one versus the other and why does it matter?".
header()
header() acts as a redirect, requiring the server to reload and removing all POST data from the form.
include()
include() acts as a forward, simply including the view and retaining all the POST data from the form.
When retaining POST data, you can inadvertently cause duplication in your database, which can result in data integrity issues. This may not be a problem for product data, but is a problem for client accounts when an email address must be unique.
References
The following PHP functions were used or referred to in this activity: