
Creating a Local Database
Local Environment
Unlike working in a shared or remote environment, a local development environment provides much more flexibility in your setup and control. However, the same tool - PHPMyAdmin - is available to work with to setup and control the local database.
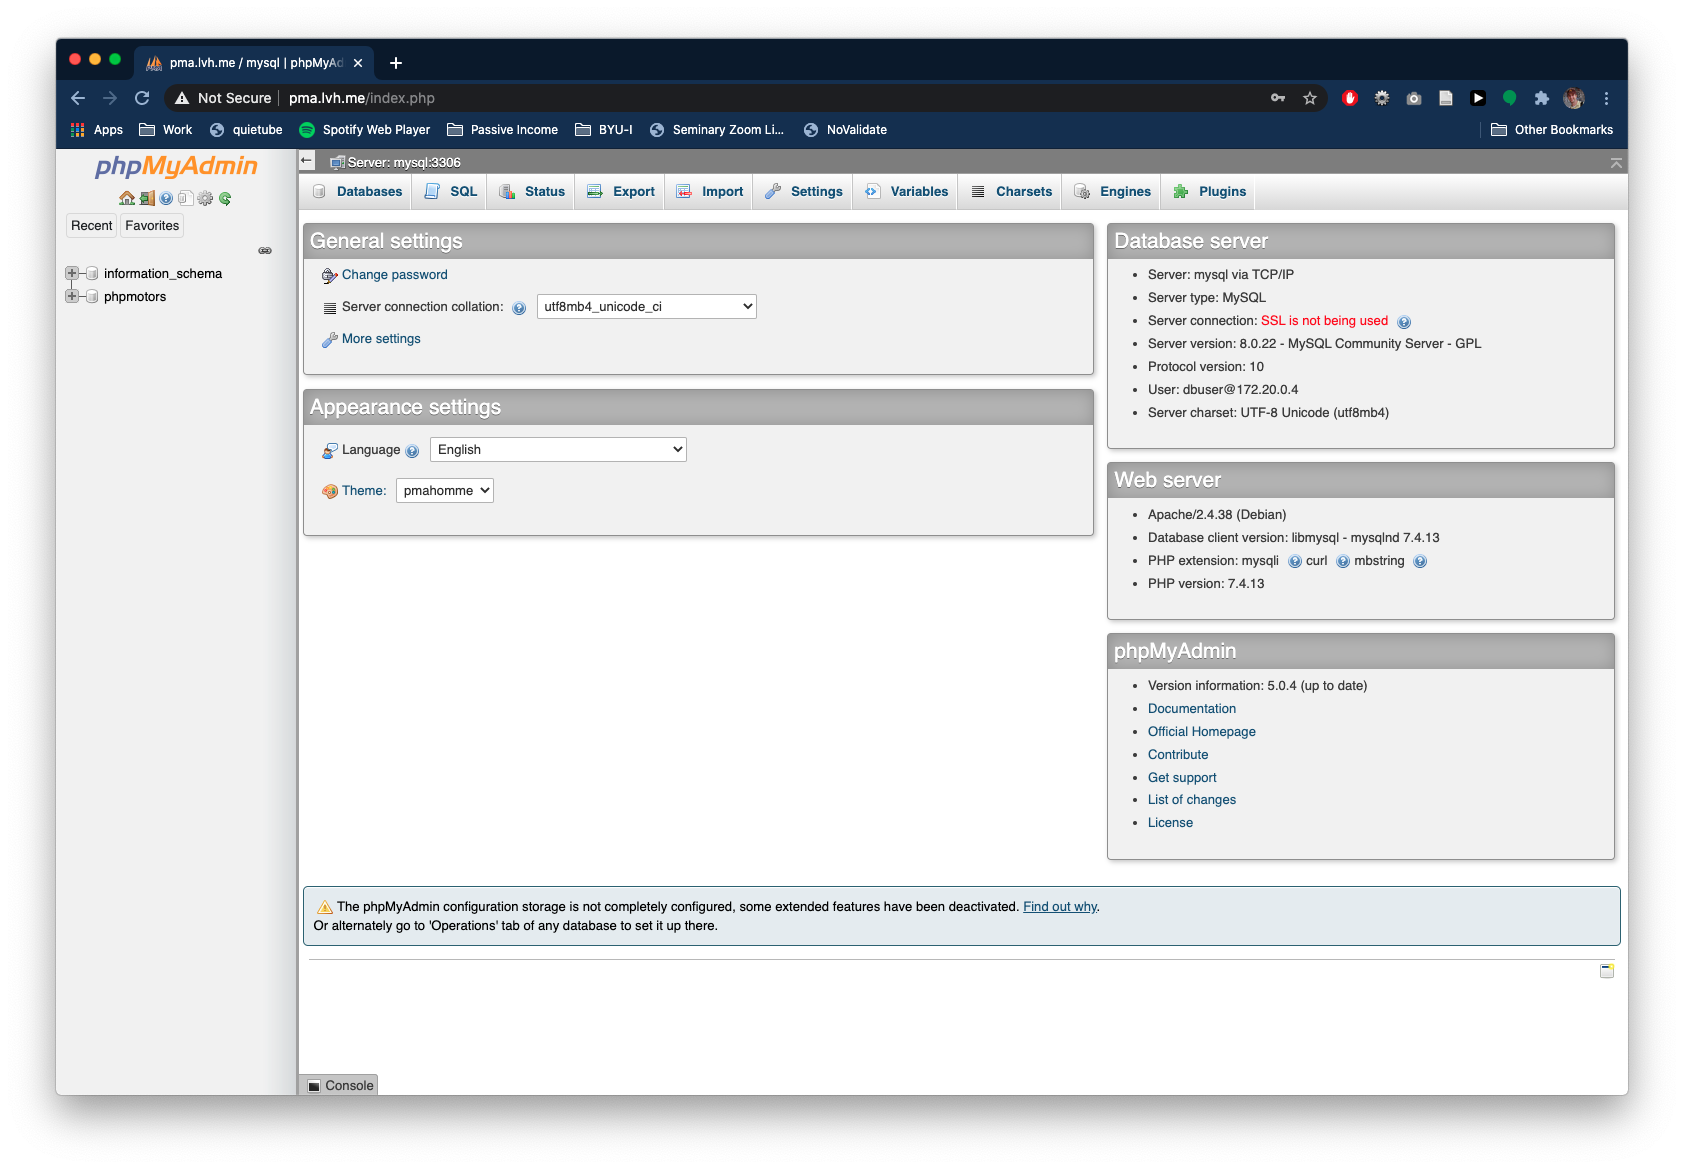
Launch PHPMyAdmin
In order to work with the local database, the local Apache and MySQL database servers must be running, this means that Docker is up and running the containers. Once they are both running:
- Open a browser.
- In the address bar type http://pma.lvh.me (or http://localhost/phpmyadmin/ if using XAMPP).
- For Docker: The username and password were set in the docker-compose.yml file. If you did not change them, for the username, enter
root. For the password, enterrootPASS - For XAMPP: No username or password is needed.
- The PHPMyAdmin tool should now be visible
Generic Processes
Creating a Local Database
This is a generic process for creating a local database for instruction only. Do not follow these steps.
- Click the "Databases" tab.
- Type the name of the new database into the "Create Database" text field.
- Click the "Create" button.
- The database should appear on the left in the database list.
- The interface should change to the "Create Table" view.
Create Table(s)
This is a generic process for creating tables from scratch or by importing a SQL file to create the tables.
- In the "Create Table" view, type the name of the new table and indicate the number of fields for the new table (if building the tables from scratch), then click the "Go" button.
- Type in and click the appropriate checkboxes to create fields from scratch.
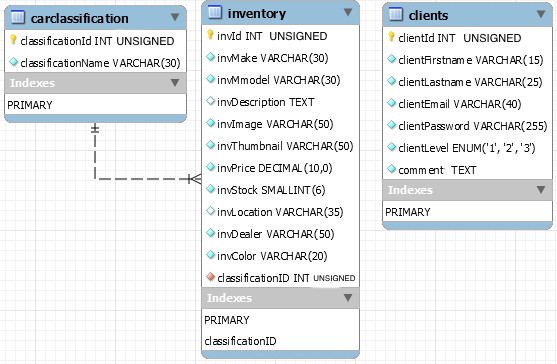
- Typically, if building from scratch you would have previously developed an Entity Relationship Diagram (ERD) to know what fields were needed, their data types and sizes and any relationships might exist between fields in different tables.
- Or, if importing a SQL file to create the tables, click the "Import" tab.
- Click the "Choose File" button and select the SQL file on your own computer.
- Scroll down, and click the "Go" button.
- If the SQL file has no errors, then the new table(s) should appear indented and below the database name on the left.
- And a success message should tell you that the queries were run successfully.
Download the PHP Motors Tables SQL File
Some tables and data have been created for you already. You will import them from an SQL file. This is a text file with SQL commands.
Download the phpmotors-db.sql.zip file to use for importing a SQL file below as part of creating the phpmotors database.
The directions below guide you through the process of importing a SQL file to create two tables and populate the tables with data for the phpmotors database.
Open The PHPMyAdmin Tool
For Docker:
- With the Docker containers running (test with
docker psin the terminal), open a browser window or new tab. - Type http://pma.lvh.me into the browser address bar.
- You can log in with the MySQL root (super) user with all privileges (needed to create a database):
username: root, password: rootPASSor with the limited MySQL user with access to the phpmotors database only (if you did not change them in the docker-compose.yml file):
username: dbuser, password: dbpass
For XAMPP:
- Make sure that XAMPP is open, and the MySQL server is running.
- Open the URL http://localhost/phpmyadmin or http://localhost/phpMyAdmin/
Create the phpmotors database
For Docker:
The process of setting up Docker created the phpmotors database for us already. Yay!
For XAMPP:
- Follow the generic process shown above for creating a database.
- Name the new database "phpmotors".
Import the SQL File
- In the list of databases (on the left) click the "phpmotors" database.
- Click the "Import" tab.
- Click the "Choose File" button.
- Navigate to your Downloads folder and select the "phpmotors-db.sql.zip" file.
- Click "Open".
- Scroll to the bottom of the Import screen and click the "Go" button.
- If things work correctly, green bars should appear indicating that the import was successful and that the queries were executed.
Check the Database
- On the left, beneath the "phpmotors" database you should see two new tables: "carclassification" and "inventory".
- You can now click either of these tables to view the data within them.
- Be default, if a table contains data the PHPMyAdmin tool opens in the "Browse" tab.
- You can click the "Structure" tab to view the fields in the table and their settings. You can also make changes to fields in this tab.
Creating the DB and Importing a SQL file
The video below illustrates the creation of the phpmotors database and importing a SQL file to create two tables as described the process above.
Creating a Table from Scratch
The video below demonstrates the building of the clients table from scratch in the phpmotors database. You should refer to the ERD (displayed earlier in this file) while building the clients table.