Temperature Sensor & LCD

This tutorial will help you put together a temperature and humidity sensor (DHT11) and be able to view the data on the Liquid Crystal Display (LCD).
Components Needed
- Arduino Uno
- DHT11 Temperature & Humidity Sensor
- LCD display
- 10K Potentiometer
- Breadboard
- wires
Arduino Library
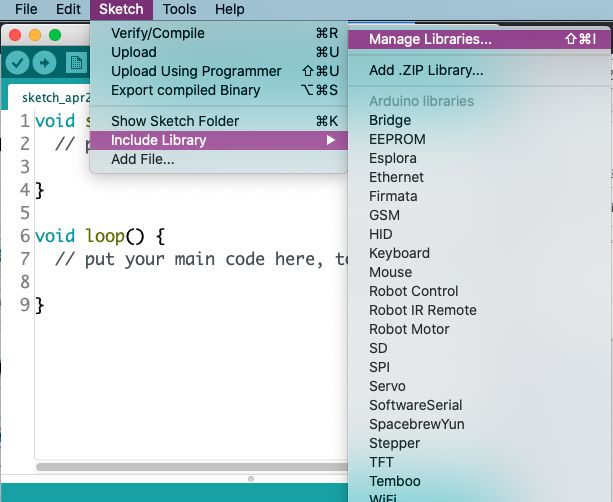
This circuit requires the DHT11 library and the Unified Sensor library from Adafruit. To install the libraries, go to the Sketch menu, then Include Library, then Manage Libraries.
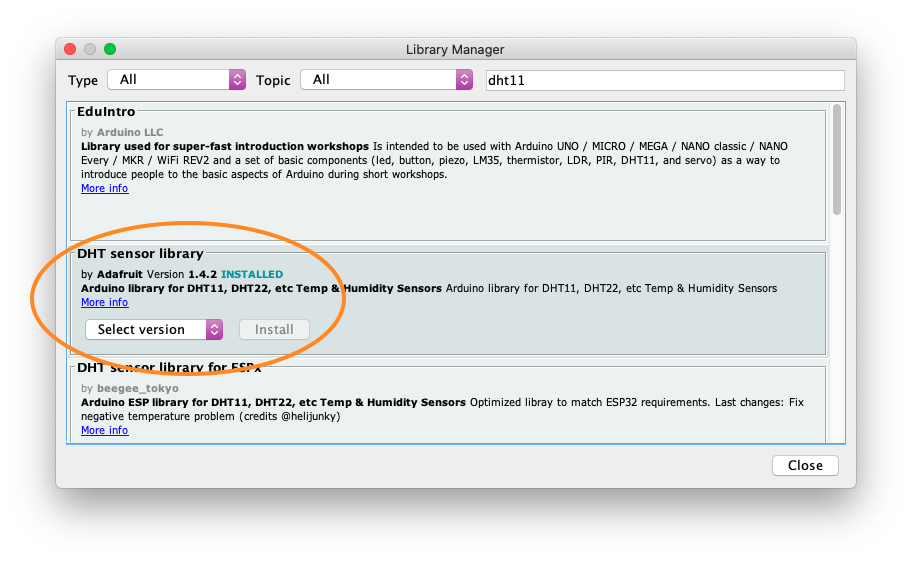
Search for “dht11” and install the library created by Adafruit.
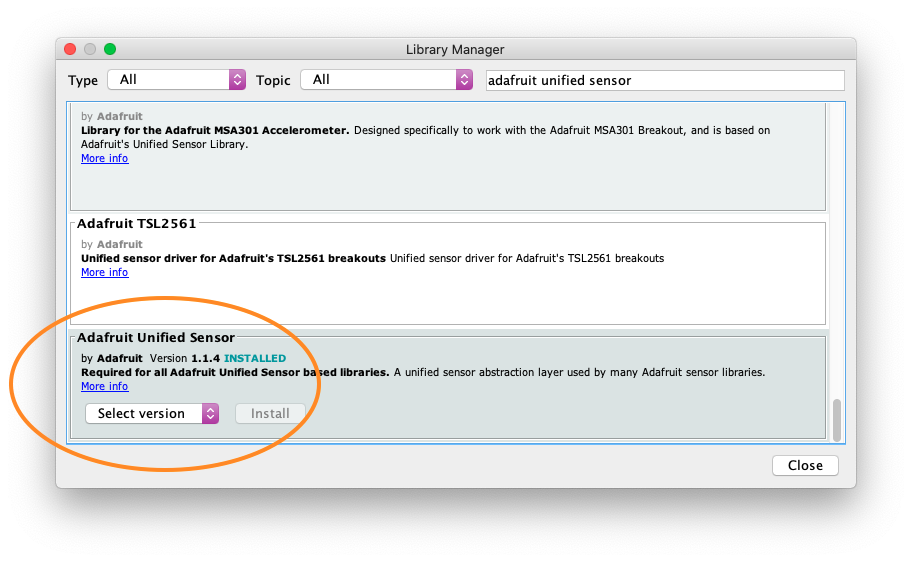
Then, search for “adafruit unified sensor” and scroll to the bottom of the results and install the “Adafruit Unified Sensor” library.
Documentation
- https://www.arduino.cc/reference/en/libraries/dht-sensor-library/
- https://www.arduino.cc/en/Reference/LiquidCrystal
Wiring Diagrams
DHT11 Sensor
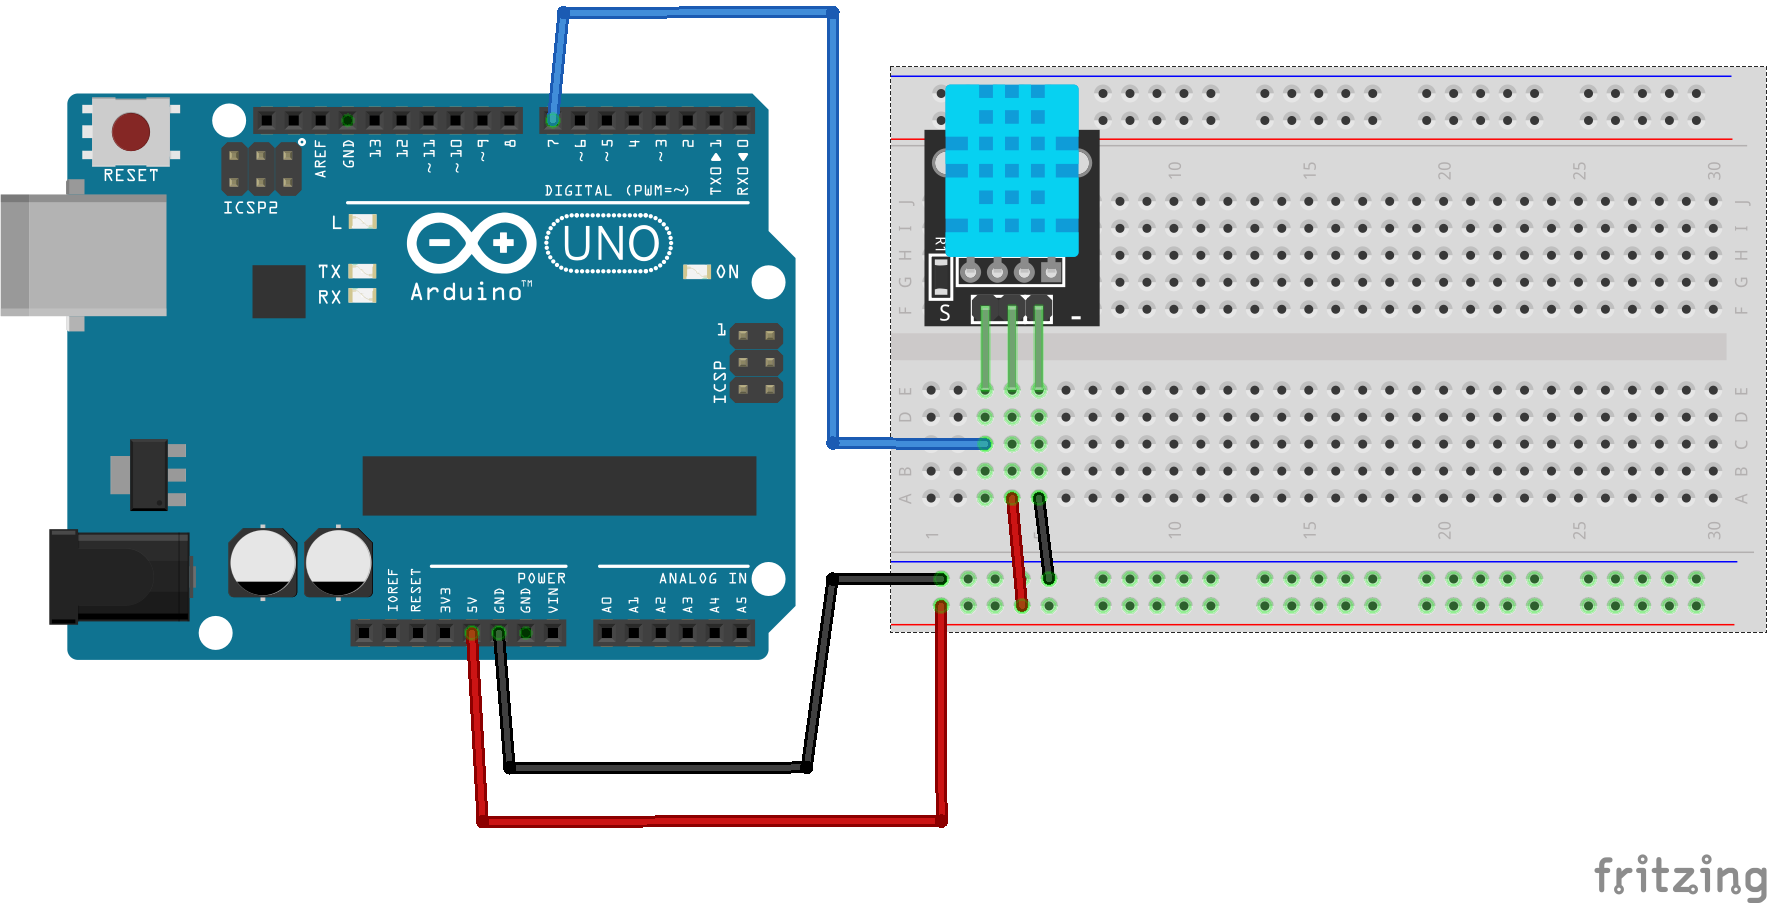
DHT11 & LCD
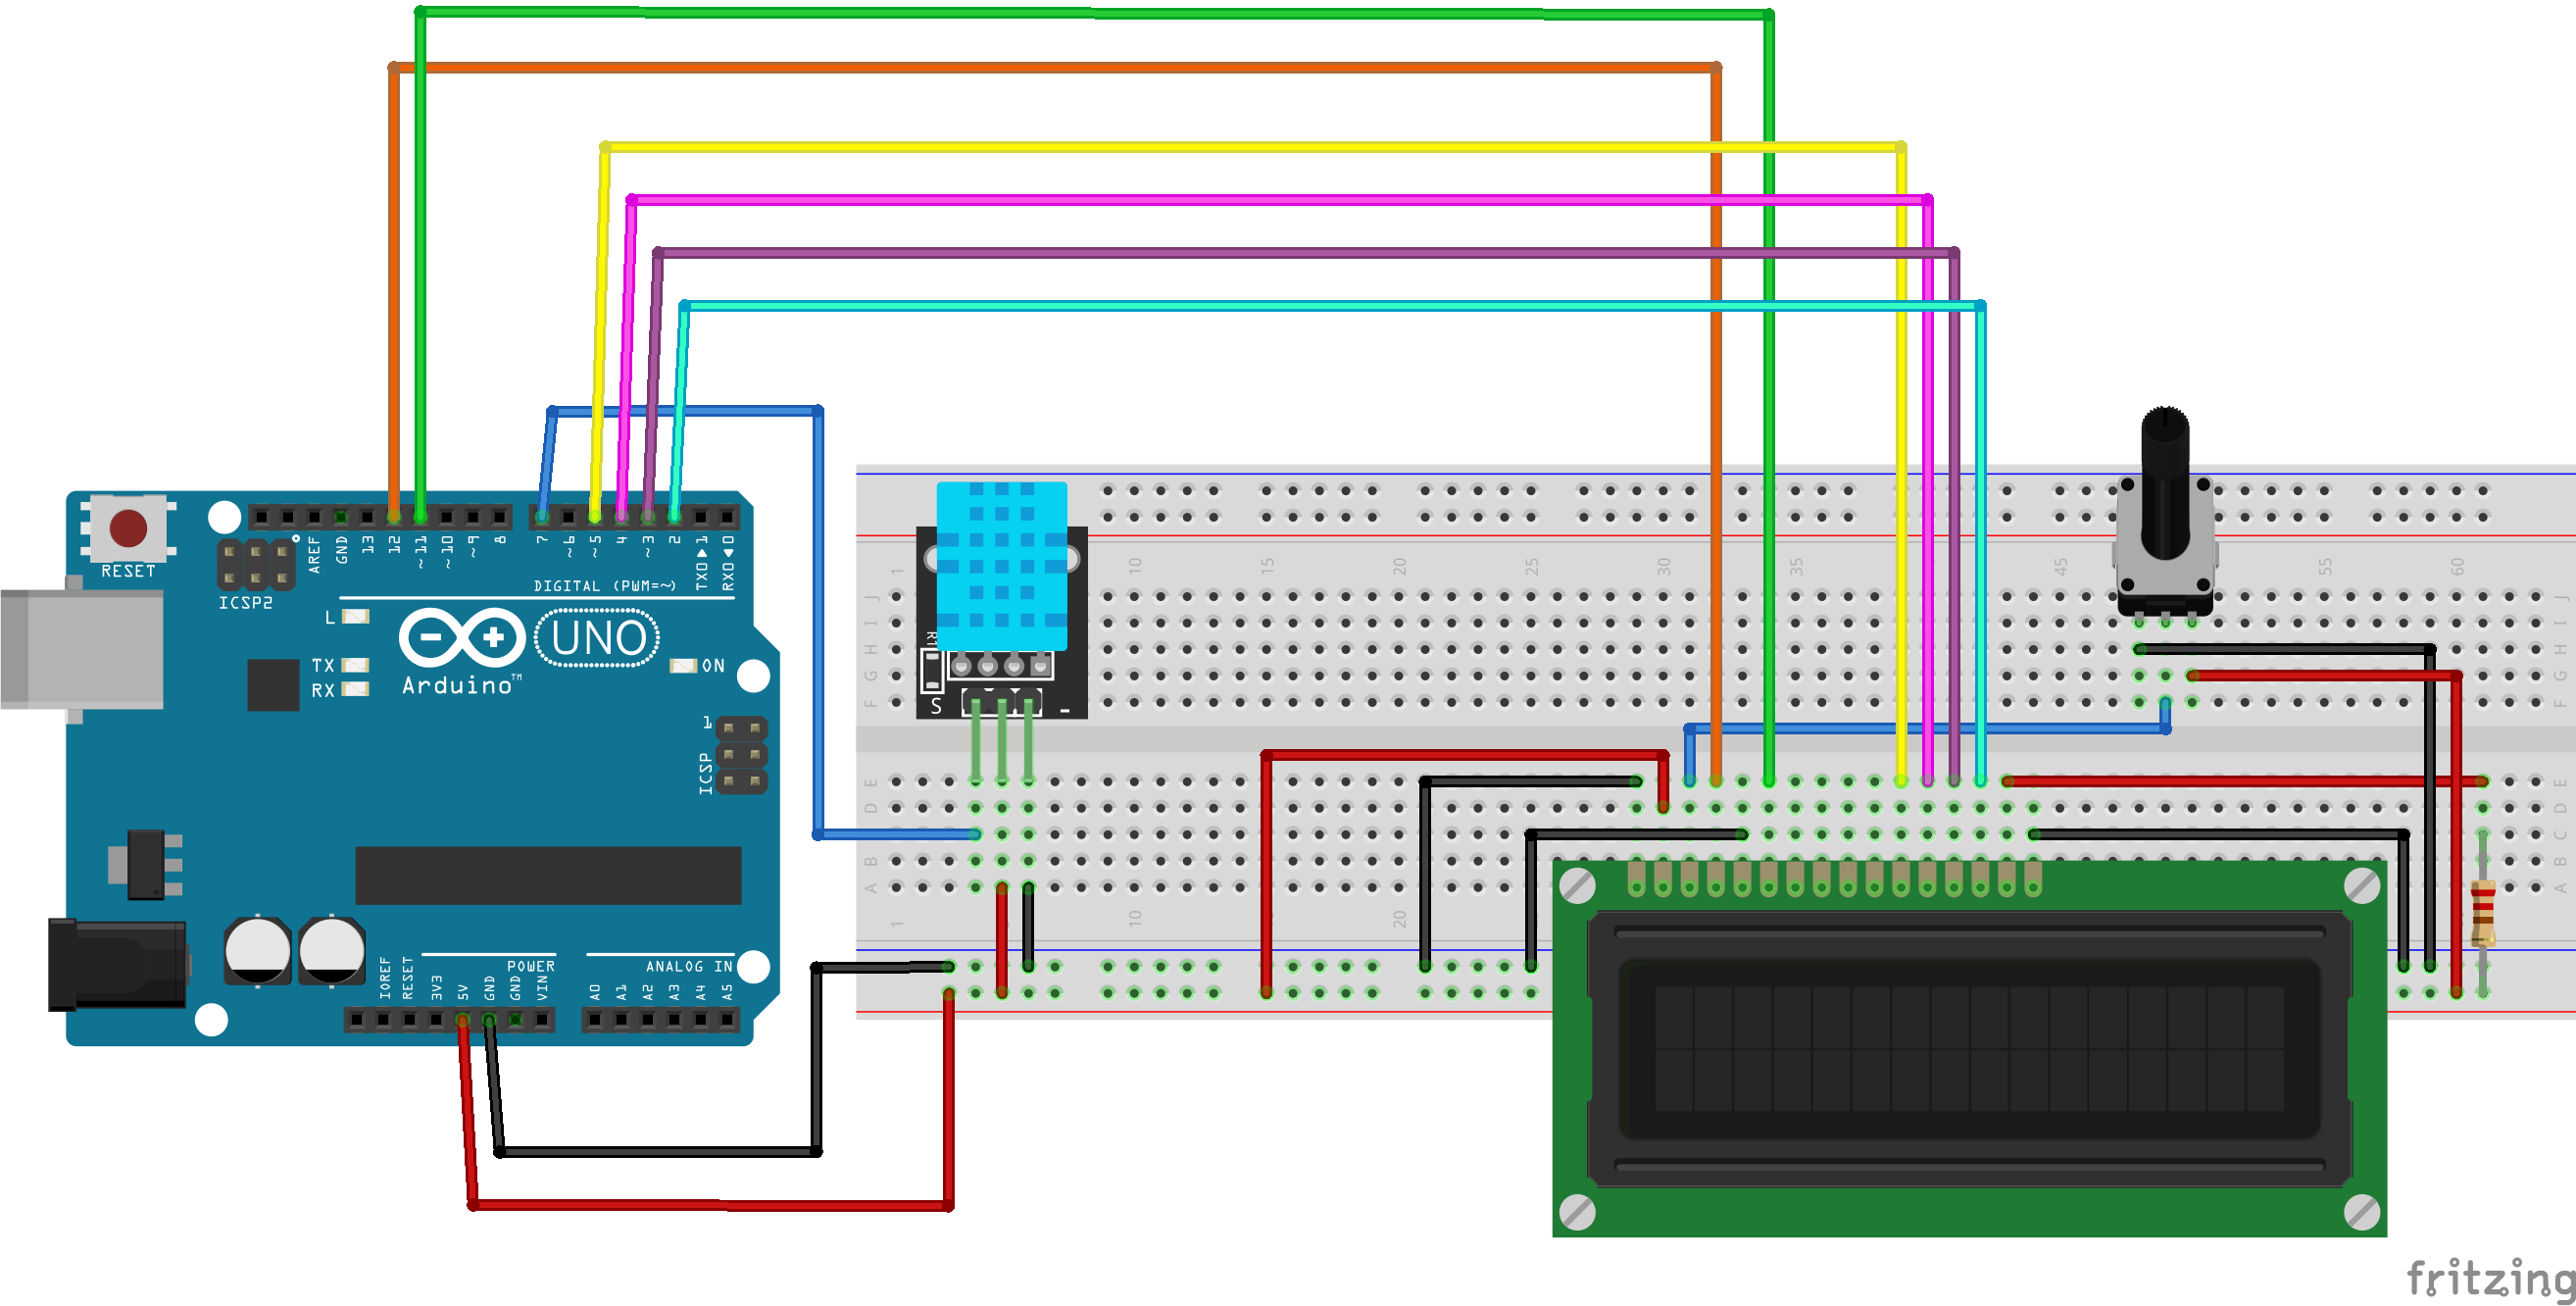
The resistor connecting pin 15 on the LCD to VCC (positive) is optional. The higher the resistance the dimmer the background light on the LCD.
Code
- DHT11 sensor
#include <DHT.h>
#define DHTTYPE DHT11

const int DHTPIN 7;

DHT dht(DHTPIN, DHTTYPE);

void setup() {
  Serial.begin(9600);

  dht.begin();
}

void loop() {
  delay(2000);

  float h = dht.readHumidity();
  float c = dht.readTemperature();
  float f = dht.readTemperature();

  Serial.print("Temperature: ");
  Serial.print(c);
  Serial.println("°C");

  Serial.print("Temperature: ");
  Serial.print(f);
  Serial.println("°F");

  Serial.print("Humidity: ");
  Serial.print(h);
  Serial.println("%");

  Serial.println();
}
- LCD
#include <LiquidCrystal.h>

LiquidCrystal lcd(12, 11, 5, 4, 3, 2);

void setup() {
  lcd.begin(16, 2);
  lcd.print("Hello World!");
}

void loop() {
  lcd.setCursor(0,1);
  lcd.print("My scrolling text...");

  lcd.scrollDisplayLeft();

  delay(1000);

}
- DHT11 and LCD
#include <LiquidCrystal.h>
LiquidCrystal lcd(12, 11, 5, 4, 3, 2);

#include <DHT.h>
#define DHTTYPE DHT11
const int DHT11_PIN = 7;
DHT dht(DHTPIN, DHTTYPE);

void setup() {
  lcd.begin(16, 2);
  dht.begin();
}

void loop() {
  delay(2000);

  lcd.setCursor(0,0);
  lcd.print("Temp: ");
  lcd.print(dht.readTemperature());
  lcd.print( (char)223); //Create the degree symbol
  lcd.print("C");

  lcd.setCursor(0,1);
  lcd.print("Humidity: ");
  lcd.print(dht.readHumidity());
  lcd.print("%");
}
Resources
Components
- Arduino
- https://www.amazon.com/Arduino-A000066-ARDUINO-UNO-R3/dp/B008GRTSV6
- DHT11 Temperature & Humidity Sensor
- https://www.satistronics.com/shop/product/180806-ky-015-dht11-digital-temperature-and-relative-humidity-sensor-module-pcb-diy-starter-kit-9249
- https://alltopnotch.co.uk/product/ky-015-dht11-temperature-and-relative-humidity-sensor-module-ntc-thermal-ky-015-arduino/
- https://www.ev3dm.com/product/dht11-digital-temperature-and-humidity-sensor-new/
- Note: Different versions of DHT11 sensors mounted on a PCB will have a
different pin layout than the one used in this tutorial. The tutorial has
pin 1 = Output, pin 2 = VCC, pin 3 = GND. These
components have pin 1 = VCC, pin 2 = Output, pin 3 = GND
- https://usa.banggood.com/KY-015-DHT11-Temperature-Humidity-Sensor-Module-p-916173.html
- https://www.amazon.com/NOYITO-Digital-Temperature-Humidity-Arduino/dp/B07HX14M4K
- https://www.adafruit.com/product/386
- Some DHT11 sensors do not come mounted on an PCB. The PCB usually has a 10K Ohm pull up resistor connected to the signal/output pin. If you use a DHT11 without the PCB and built-in pull up resistor, then you will need to add the resistor to your circuit.
- LCD display
- https://www.amazon.com/Arducam-Display-Controller-Character-Backlight/dp/B019D9TYMI
- 10K Potentiometer
- https://www.amazon.com/uxcell-Carbon-Potentiometer-Variable-Resistors/dp/B07W78RFQF
- Breadboard
- https://www.amazon.com/HiLetgo-Solderless-Breadboard-Circuit-Prototyping/dp/B00LSG5BJK
- wires
- https://www.amazon.com/Elegoo-EL-CP-004-Multicolored-Breadboard-arduino/dp/B01EV70C78
- Or get a full kit
- https://www.amazon.com/ELEGOO-Project-Tutorial-Controller-Projects/dp/B01D8KOZF4
Other Tutorials
- https://www.electronicshub.org/dht11-humidity-sensor-arduino/
- https://www.circuitbasics.com/how-to-set-up-the-dht11-humidity-sensor-on-an-arduino/
- https://www.circuitbasics.com/how-to-set-up-an-lcd-display-on-an-arduino/
- https://learn.sparkfun.com/tutorials/sparkfun-inventors-kit-experiment-guide—v40/circuit-4a-lcd-hello-world
- http://omerk.github.io/lcdchargen/